The Projects module lets you plan, track, and manage equipment for various types of projects. Use it to with automatic availability calculation, monitor deliveries and returns, and especially get automatically calculate availability to avoid scheduling conflicts.
Prerequisites
To use the Projects module, your user account must have the Project privilege at full access.
View and find projects
The project view shows projects in a table format. You can search by keywords, filter, sort, group, and switch views to find projects.
Search
Use the search box to quickly find projects based on their identification details.
To search, enter your project ID. To get exact matches, enclose the search keyword in quotation marks (“”) - for example, “ABC123”.
Views
Use views to customize how the project list is displayed and organized. You can choose from:
- Standard views: Predefined and not editable.
- Your own views: Editable and visible to only you.
- Shared views: Created by others and shared with you.
Within each view, you can:
- Name the view
- Choose who can see it
- Set default filters
- Select fields and properties to display
- Set default sorting and grouping. You can sort by up to 3 levels.

Actions with a project view:
- Switch between views: Select the current view > Pick a view > Select an option from the list.
- Set a view as the default view every time you access the Projects module: Switch to the relevant view > Select Pin.
- Create a new view: Select the current view > Create new view > Enter the relevant values > Save.
- Copy a view: Select the current view > Create copy > Name the copy > Apply.
- Edit a view: Select the current view > Edit current view > Enter the new values > Save.
- Delete view: Select the current view > Delete view.
- Find the view’s created and modified information: Select the current view > Properties.
Filter
Use filters to narrow down the project list by applying multiple criteria. To filter by one or more criteria: Open the Filter panel > Fill in the relevant fields > Select Apply.
Sort the project list to organize it by a specific field.
- Sort: Select a column header > Sort A to Z or Sort Z to A.
- Remove sorting: Select the column header > Default from view.
General projects
Create a general project
To create a general project, in the Projects module, select New > Enter the project detail > Create.
| Field | Instruction |
|---|---|
| Active status | Select the relevant value. |
| Project ID | Enter the relevant value. This field is mandatory. |
| Start | Select the project’s start date. |
| End | Select the project’s end date. |
| Responsible | Select the relevant contact of your company. |
| Comment | Enter the relevant value. |
| Project type | Select “General”. |
Add equipment to general projects
You can edit an equipment’s Project field to add it to a general project, or edit multiple equipment’s projects at once.
Inspection projects
Use inspection projects to plan equipment used in inspections, assign inspectors, and track job progress.
Configuration
Create project workflow
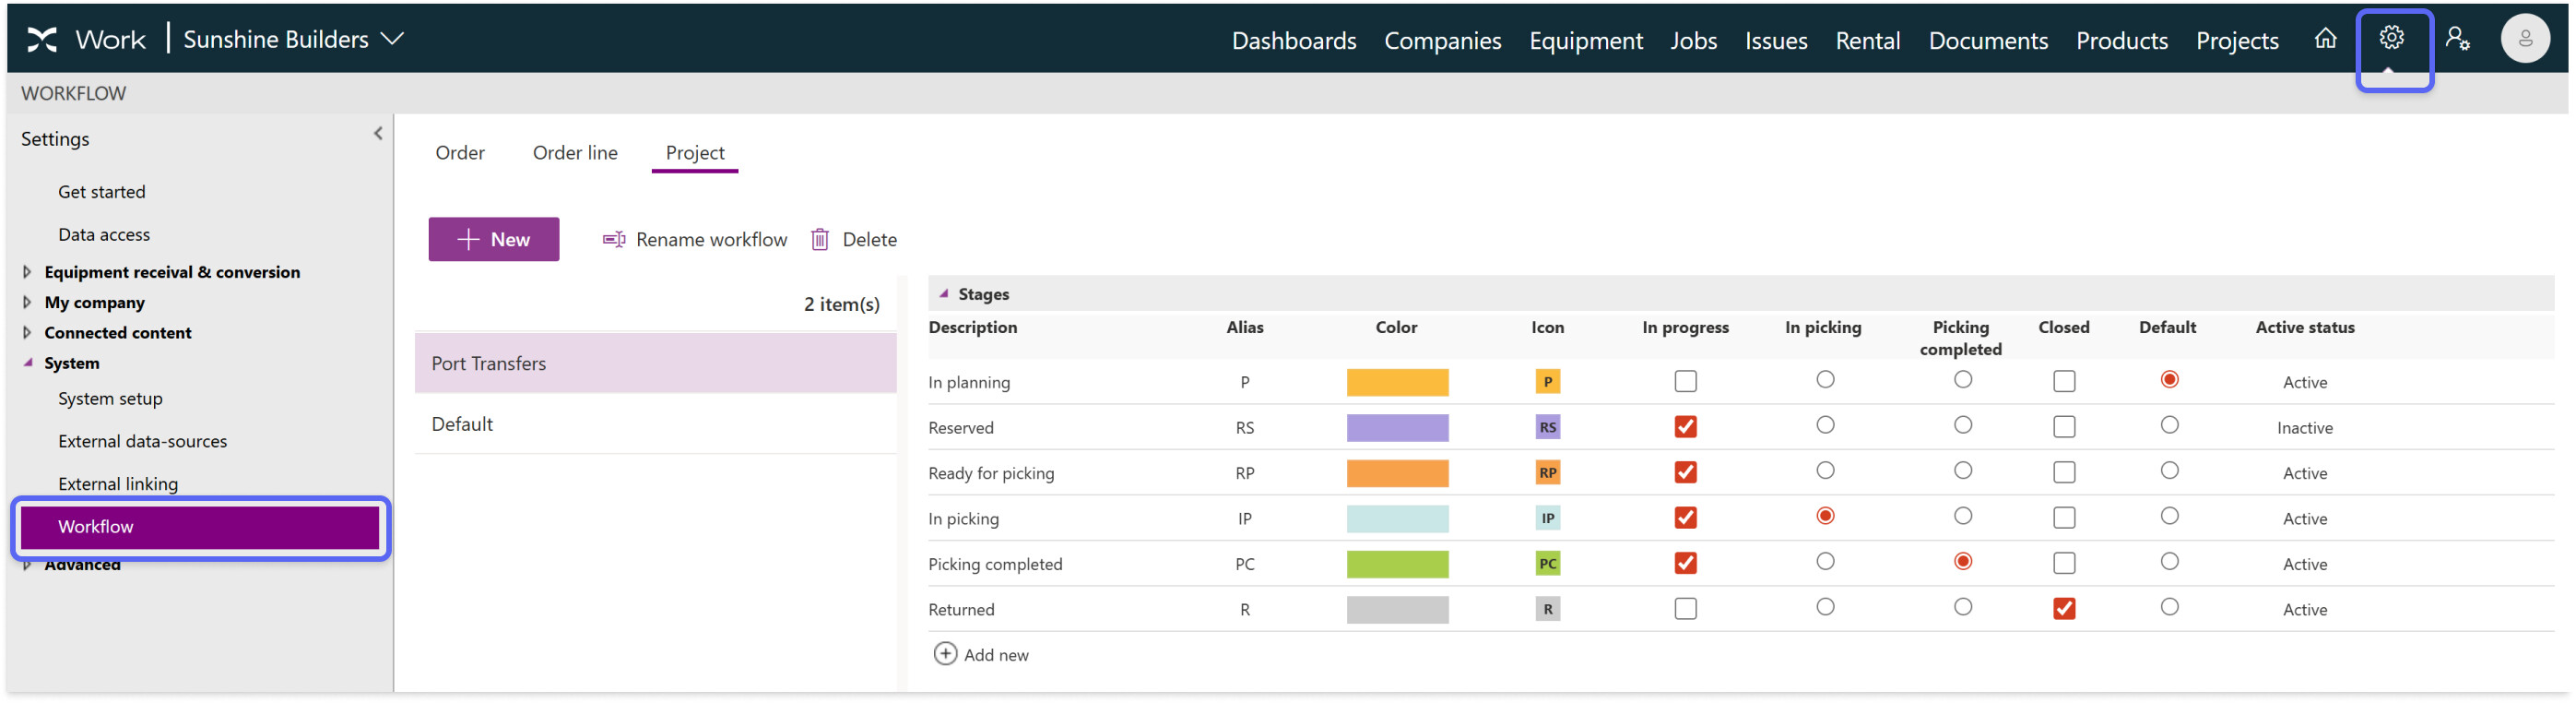
A workflow defines the stages of a project. The number of stages and each stage’s description can be freely customized. You can create one or multiple workflow profiles for different projects.
- In Onix Work, go to Settings > Workflow > Project
- Select New
- Enter the new workflow profile’s name and select “Inspection project” as project type
- Select New to create stages manually, or Get sample workflow stages to start with Onix default stages
- Click on each stage to edit its description, translation, alias and color. The stage’s icon will adjust accordingly.
- Set up the stages’ behaviors.
| Field | Description |
|---|---|
| In progress | Allows inspectors to filter and download projects in this stage in Onix Inspect |
| Closed | Marks the inspection project as completed and prevents further editing |
After creating a project workflow, you can:
- Remove a stage of any workflow: Select the workflow > Select a stage > Set its active status to “Inactive” > (Optional) Delete it. You can only delete a project stage if it has never been used in any project.
- Rename a workflow: Select the workflow > Rename workflow.
- Delete a workflow: Select the workflow > Delete. You can delete a workflow only if it has never been used in any project.

Create project variant
Project variants define the operational logic and default values for inspection projects.
- In Onix Work, go to Settings > Projects > Variants
- Select New
- Enter the project variant details
| Field | Description |
|---|---|
| Variant name | The name of the project variant. |
| Project type | Select “Inspection project” |
| Description | Additional notes about the project variant. |
| Project ID assignment | Determines how project IDs are entered during project creation. |
| Default project responsible | The default responsible user for new projects created from this variant. |
| Workflow | The workflow used by projects created from this variant. |
After creating a project variant, you can:
- Set a variant as default for new projects.
- Delete the variant if it has never been used in any project.

Create inspection projects
Create inspection projects to plan equipment used in inspections.
To create an inspection project:
- In Onix Work, go to Projects.
- Select New.
- Enter the project details.
| Field | Description |
|---|---|
| Active status | Determines whether the inspection project is in use. |
| Project variant | Select the variant that provides the required workflow and default settings. |
| Start, End | The inspection project’s start and end dates. |
| Equipment owner | The company that owns the equipment in the project. |
| Location, Area | The equipment location and area for the inspection project. |
| Assigned to | The inspectors assigned to the project. |
| Project responsible | The user responsible for the inspection project. |
| Comment | Additional notes about the project. |
Plan inspection projects
Add equipment before inspectors begin work.
To add equipment:
- In Onix Work, go to Projects > Open an inspection project.
- Select Add equipment > Select the relevant equipment.
After you add equipment, move the project to an “In progress” stage so inspectors can access it in Onix Inspect.

View job progress
After inspection data from Onix Inspect is uploaded, you can view the job progress for each equipment in the inspection project:
- The number of open mandatory jobs
- The number of completed mandatory jobs
Complete inspection projects
Complete projects after inspection work is finished.
To complete one or more projects:
- In Onix Work, go to Projects.
- Select one or more inspection projects.
- Select Mark as completed.
The selected inspection projects then update to “Inactive” status.

Rental and transfer projects
Configuration
Create project workflows
A workflow defines the stages of a project. The number of stages and each stage’s description can be freely customized. You can create one or multiple workflows for different projects.
- In Onix Work, go to Settings > Workflow > Project
- Select New to create a new stage, or select Get sample workflow stages to start from Onix’s set of default stages
- Click on each stage to edit its description, translation, alias and color. The stage’s icon will adjust accordingly.
- Set up the stages’ behaviors following these instructions.
| Field | Instructions |
|---|---|
| In progress | Requests at this stage confirms the usage of equipment, product and equipment group within the specified period; in other words, the item cannot be used at the same time by other requests. These requests are accessible in Onix Tool Store, and their details are not editable. |
| In picking | A request at this stage is in the picking process via Onix Tool Store. |
| Picking completed | A request at this stage has finished the picking process, and delivered quantity has fulfilled the planned quantity. |
| Closed | A request at this stage is complete. |
After creating a project workflow, you can:
- Remove a stage of any workflow: Select the workflow > Select a stage > Set its active status to “Inactive” > (Optional) Delete it. You can only delete a project stage if it has never been used in any project.
- Rename a workflow: Select the workflow > Rename workflow.
- Delete a workflow: Select the workflow > Delete. You can only delete a workflow if it has never been used in any project.
Create project variants
Project variants define the operational logic and default fields of different types of projects.
- In Onix Work, go to Settings > Projects > Variants
- Select New to create a project variant
- Complete the project variant
| Field | Description |
|---|---|
| Variant name | The name of the project variant. |
| Project type | Select “Rental/Transfer project” |
| Description | Additional notes about the project variant. |
| Project ID assignment | Determines how project IDs are entered during project creation. |
| Default project responsible | The default responsible user for new projects created from this variant. |
| Update equipment location on project completion | Select an option from the list. When location is updated on project completion, unique equipment is transferred to the destination location. For stock goods and consumable goods, the quantity decreases at the source location and increases at the destination location. |
| Allow send/receive equipment with issues and overdue inspection | Select an option from the list. If the setting is enabled, equipment that meet any of these conditions will be prevented from reserving and sending in both Onix Work and Onix Tool Store: - Have at least one NC issue - Have at least one overdue RC issue - Have at least one overdue mandatory inspection |
| Workflow | The workflow used by projects created from this variant. |
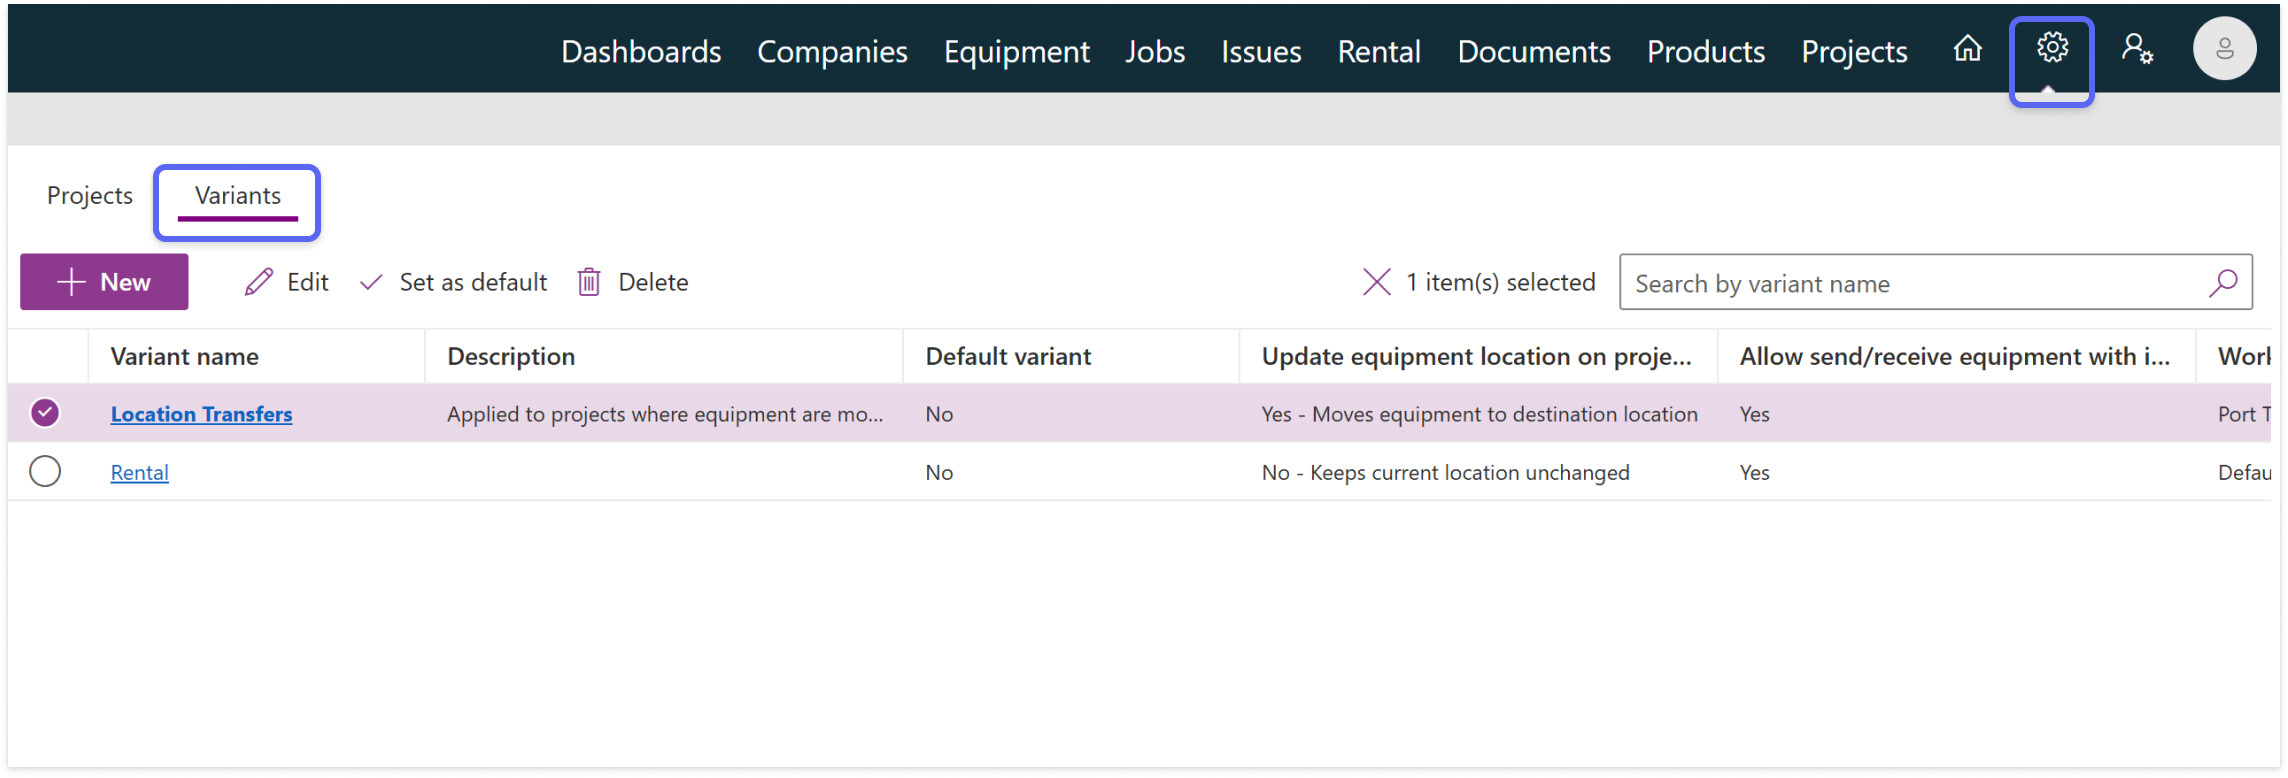
After creating a project variant, you can:
- Set a variant as default for new projects.
- Delete the variant if it has never been used in any project.
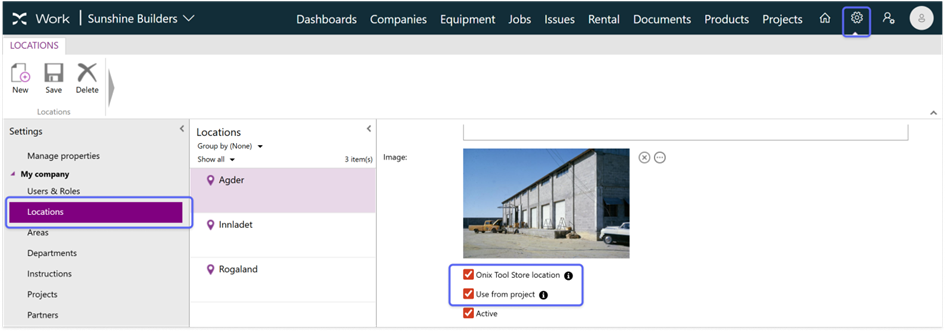
Enable locations to be used in projects
Enable locations so they can be used as source locations in projects.
In Onix Work, go to Settings > Locations, select the location, and turn on Use from project.
Create a new rental or transfer project
To create a new rental or transfer project, in Onix Work, go to Projects, select New, and enter the project detail following these instructions.
| Field | Instructions |
|---|---|
| Field | Description |
| — | — |
| Active status | Determines whether the rental or transfer project is in use. |
| Project variant | Select the variant that provides the required workflow and default settings. |
| Project ID | If the project variant allows manual entry, enter an identification for the project. |
| Start, End | The project’s start and end dates. |
| Responsible | Select the user that is responsible for the project |
| Comment | |
| Source locations | The location from which equipment and products are delivered. |
| Place to be used/Destination location | The location to which equipment and products are delivered. |

Plan rental projects
Rental projects use a project variant where equipment remains at its source location after the project is completed. In this type of project, you can create reservation requests for unique products, unique equipment, stocks and consumable goods.
For unique equipment and products
To request and reserve unique equipment and products in a rental project:
- In Onix Work, go to Projects.
- Open a project.
- Select Add product or Add equipment > Select one or multiple items > Add.
- Select the new request’s planned dates and source location.
- If the request is based on a product, enter the planned quantity. The planned quantity must be smaller than the available quantity.
- Enter comments if necessary.
- Select the new request > Actions > Reserve.

For stocks and consumable goods
To request and reserve stocks and consumable goods in a rental project:
- In Onix Work, go to Projects.
- Open a project.
- Select Add products > Select one or multiple items > Add.
- Select the new request’s planned dates and source location.
- Enter the planned quantity. The planned quantity must be smaller than the available quantity.
- Enter comments if necessary.
- Select the new request > Actions > Reserve.
For equipment groups
Create requests within a project and reserve them to plan equipment usage in different time frames.
- In Onix Work, go to Projects and Open a project
- Select Add equipment group > Select one or multiple items > Add.
- Select the new request’s planned dates and source location.
- Enter comments if necessary.
- Select the new request > Actions > Reserve.
Plan transfer projects
Transfer projects use a variant that updates the equipment location automatically when the project is completed. In transfer projects, you can create reservation requests for equipment of all classes and equipment groups.
For unique equipment and products
Create requests within a project and reserve them to plan equipment usage in different time frames.
- In Onix Work, go to Projects.
- Open a project.
- Select Add product or Add equipment > Select one or multiple items > Add.
- Select the new request’s planned dates and source location.
- If the request is based on a product, enter the planned quantity. The planned quantity must be smaller than the available quantity.
- Enter comments if necessary.
- Select the new request > Actions > Reserve
For stock and consumable goods
Create requests within a project and reserve them to plan equipment usage in different time frames.
- In Onix Work, go to Projects.
- Open a project.
- Select Add products > Select one or multiple items > Add.
- Select the new request’s planned dates and source location.
- Enter the planned quantity. The planned quantity must be smaller than the available quantity.
- Enter comments if necessary.
- Select the new request > Actions > Reserve
For equipment groups
Create requests within a project and reserve them to plan equipment usage in different time frames.
- In Onix Work, go to Projects
- Open a project
- Select Add equipment group > Select one or multiple items > Add.
- Select the new request’s planned dates and source location.
- Enter comments if necessary.
- Select the new request > Actions > Reserve.
Complete requests and projects
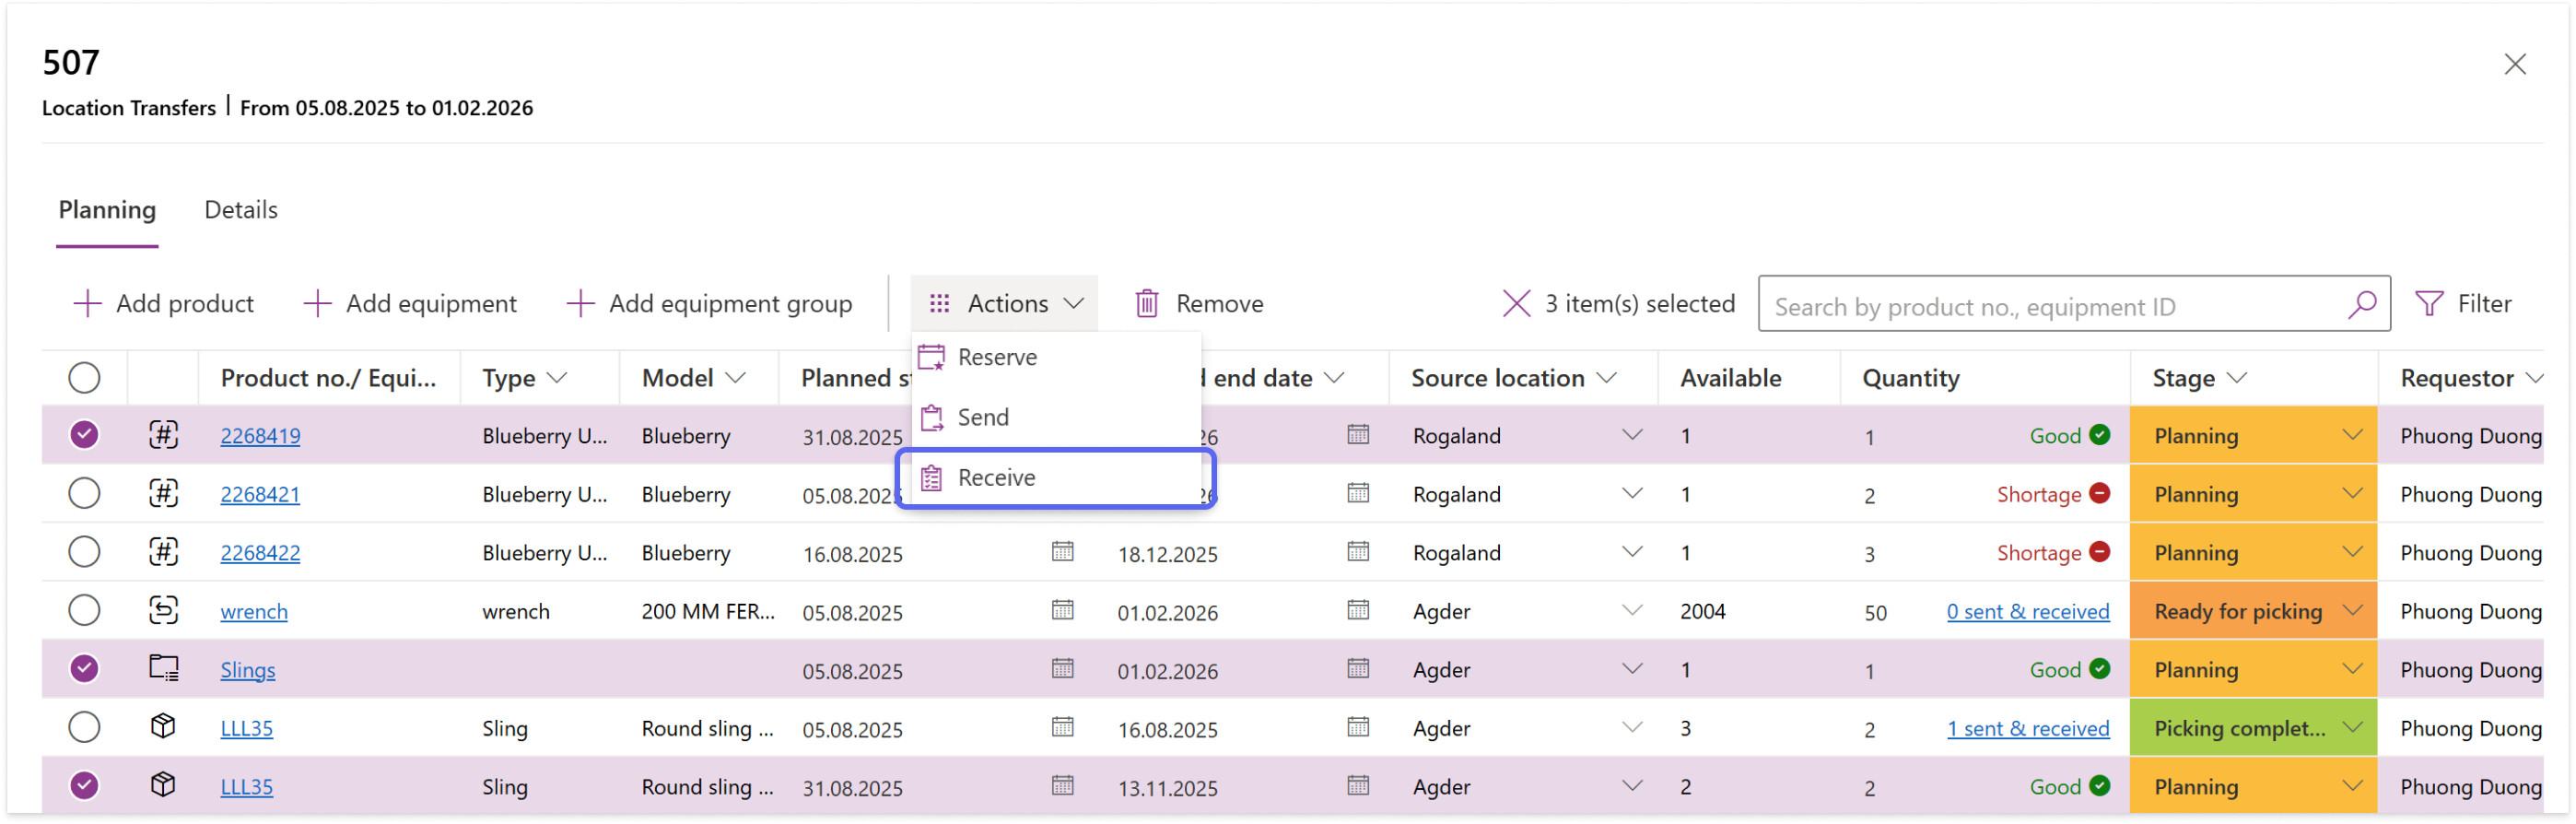
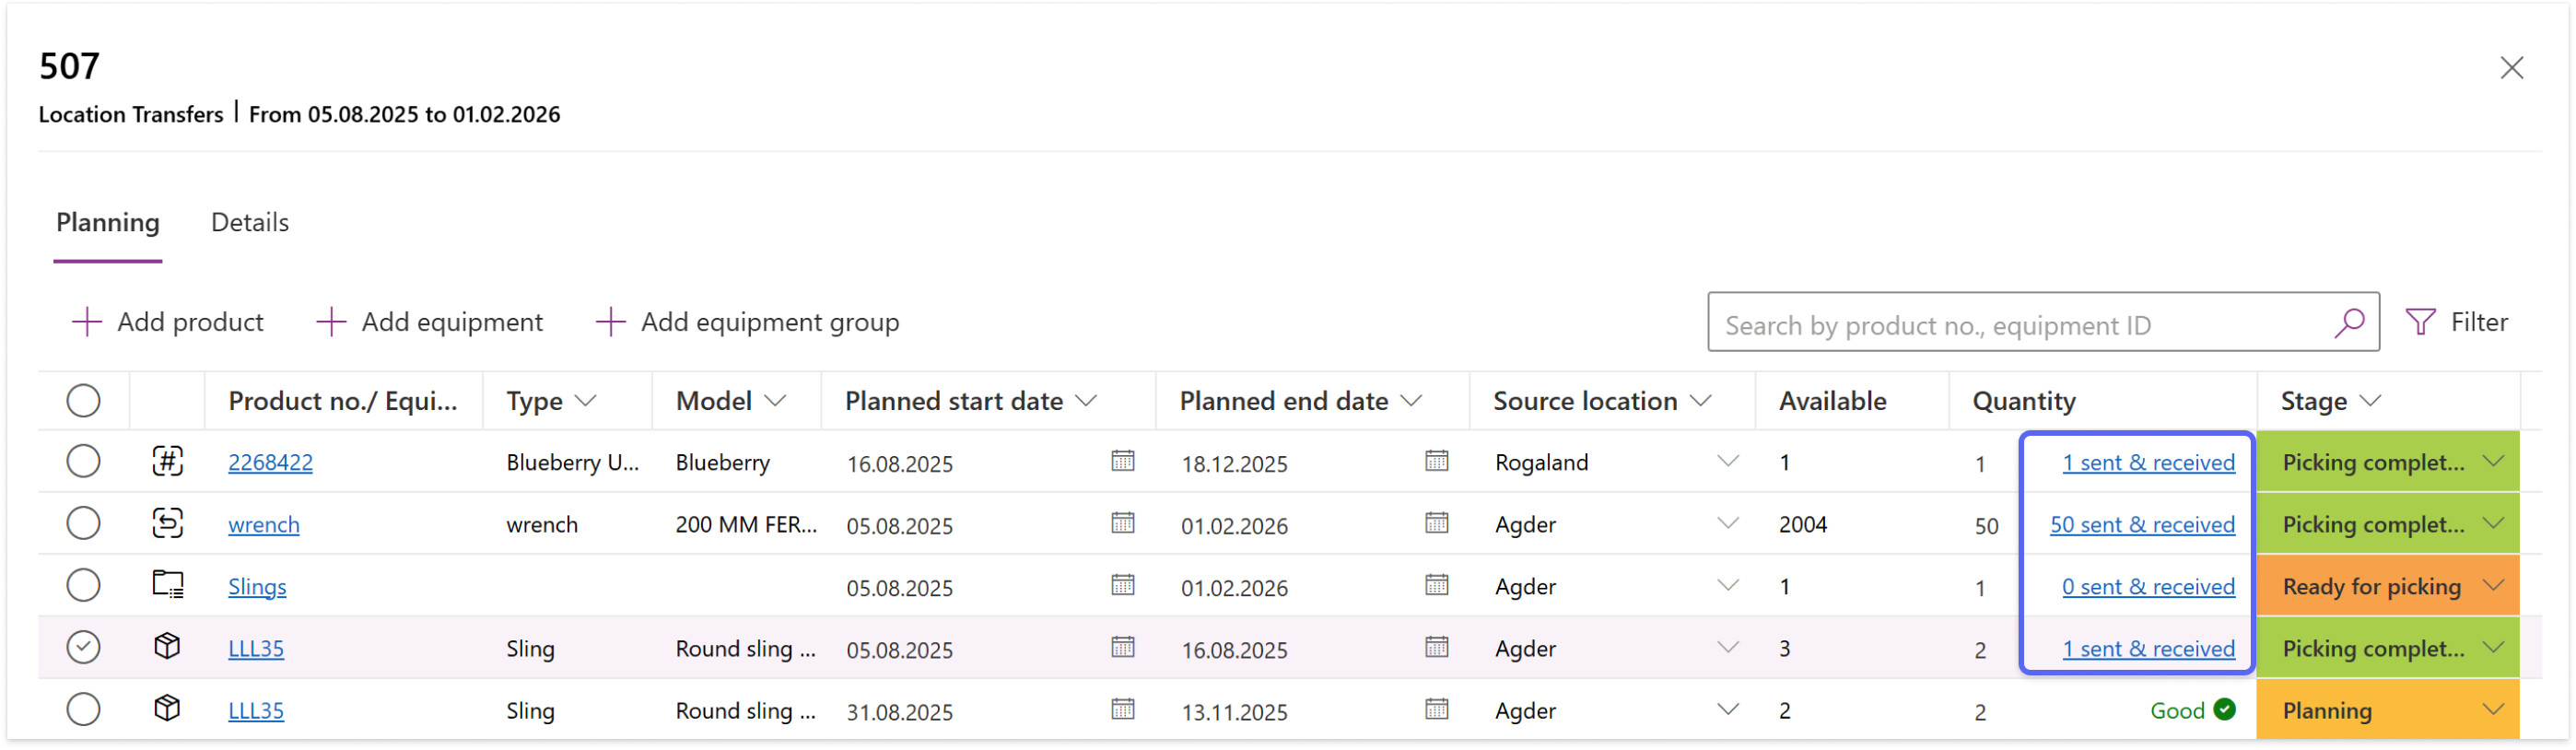
View sent and received equipment of a project
Each project shows the actual quantities of equipment sent and received next to the planned quantity.
- In Onix Work, go to Projects
- Open the project and select the Planning tab
- At each request’s quantity, check the summary of items sent and received
- Select the summary to open detailed information
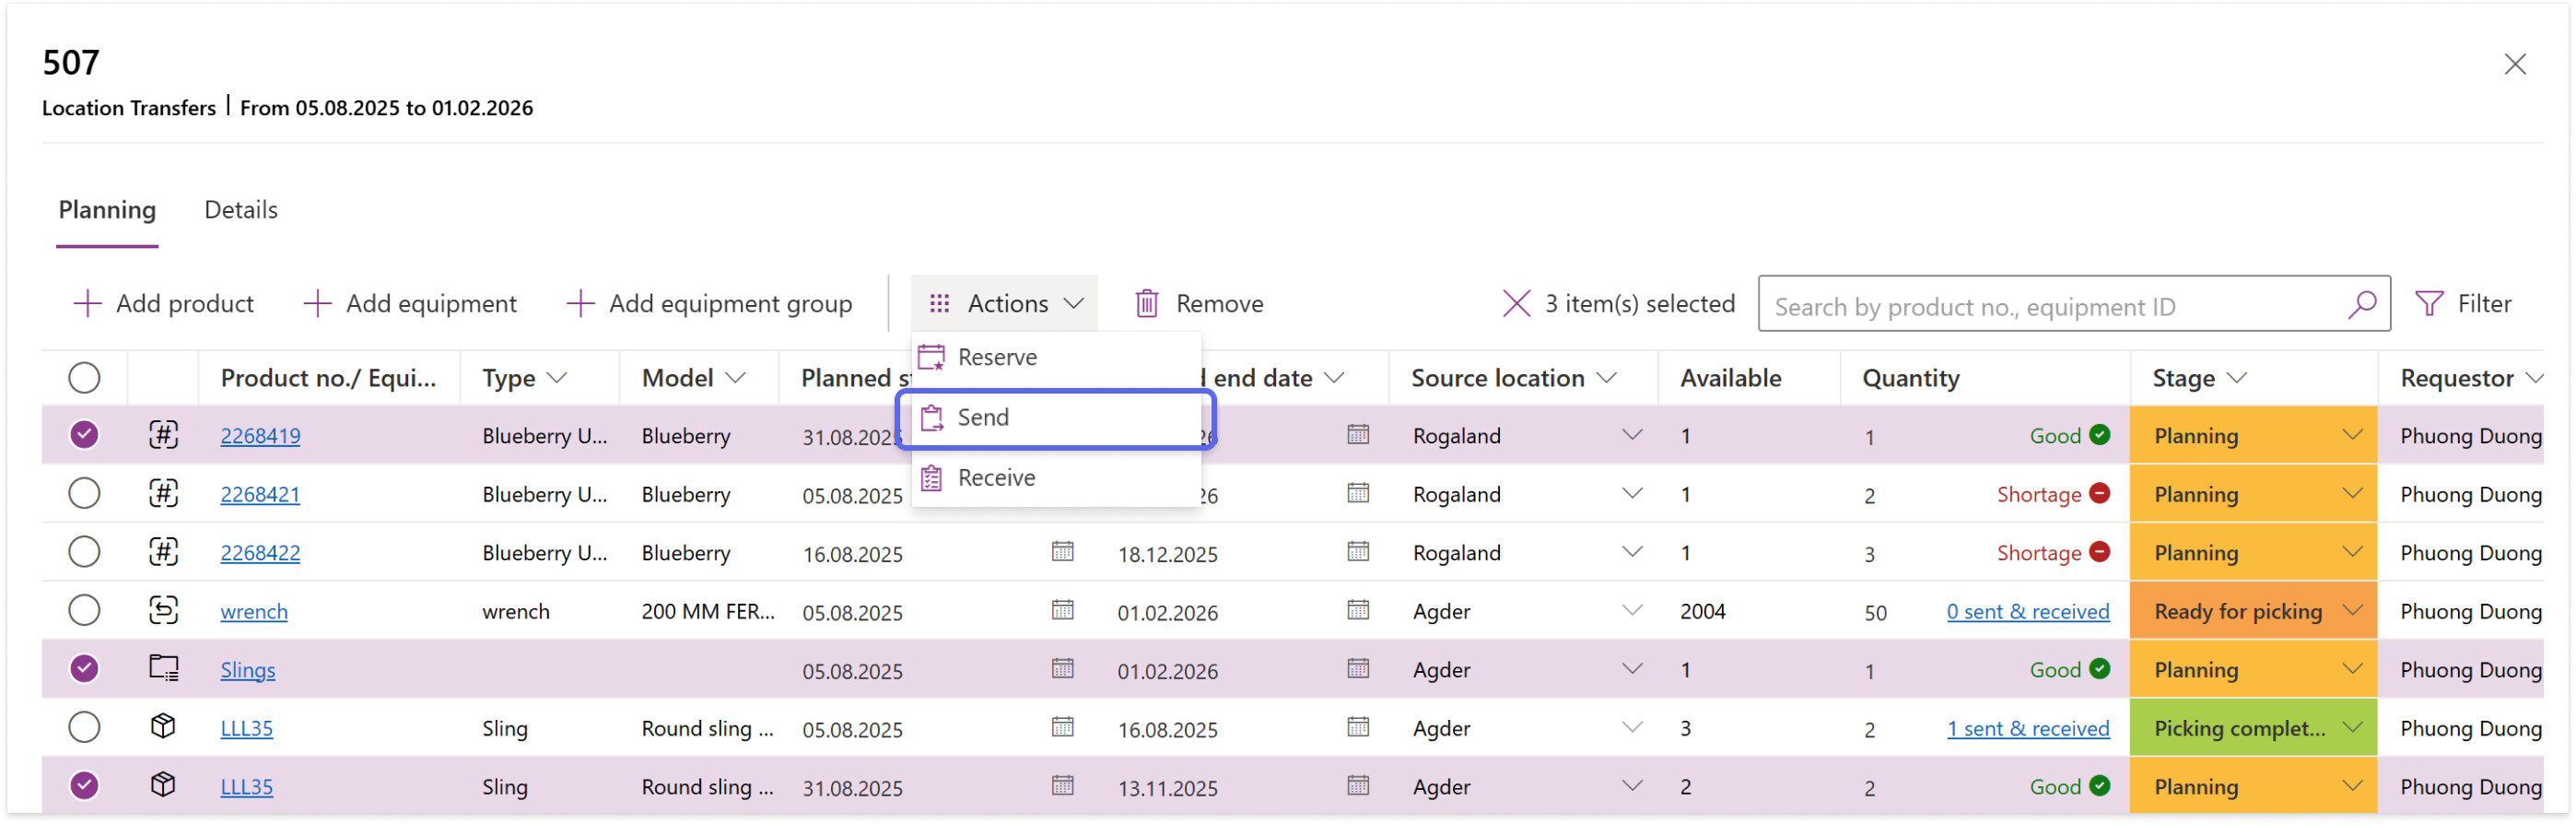
Complete requests without adjustments
When the actual quantities sent or received match the planned quantities, you can complete a request without any adjustments.
- In Onix Work, go to Projects.
- Open the project and select one or more requests.
- (Optional) On the toolbar, select Actions > Send. The request stage updates to indicate that picking is completed, and the sent quantity matches the planned quantity.
- On the toolbar, select Actions > Receive. The request stage now updates to indicate that the request is completed, and the received quantity matches the planned quantity.
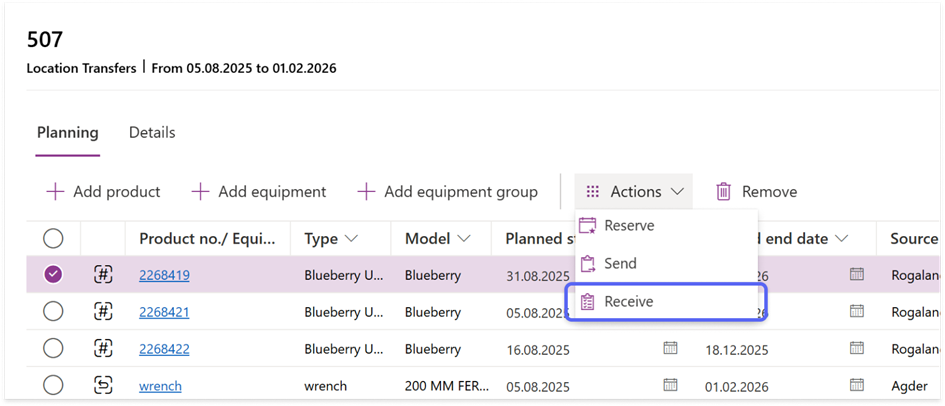
Complete requests with adjustments
Before completing a request, you can select unique equipment or adjust the quantities of stock and consumable goods that are actually sent and received.
To adjust and complete requests for unique products:
- In Onix Work, go to Projects.
- Open the project > Open the request’s sent and received details.
- Select Add equipment > Choose one or more items > Add.
- Return to the planning table.
- (Optional) Select the request > Select Actions > Send.
- Select Actions > Receive. The request stage then updates to indicate that the request is completed, and the received details update accordingly.

To adjust and complete requests for stock and consumable goods:
- In Onix Work, go to Projects.
- Open the project > Open the request’s sent and received details.
- Select Set quantity > Enter the actual sent or received quantities > Save.
- Return to the planning table
- (Optional) Select the request > Select Actions > Send.
- Select Actions > Receive. The request stage then updates to indicate that the request is completed, and the received details update accordingly.

Complete one or more projects
You can complete one or more projects at once, with the maximum number of requests at 1000.
- In Onix Work, go to Projects.
- Select one or more projects from the list.
- Select Mark as completed.
When your action is successful, all selected projects immediately update to the “Inactive” status, and their requests automatically update stages and details to indicate completion.
Project completion might fail if:
- Not all requests have available equipment or entered planned quantities.
- Picked quantities for stock and consumable goods exceed the planned quantity.
- The project restricts the use of equipment with issues or overdue inspections, and one or more requests include such equipment.
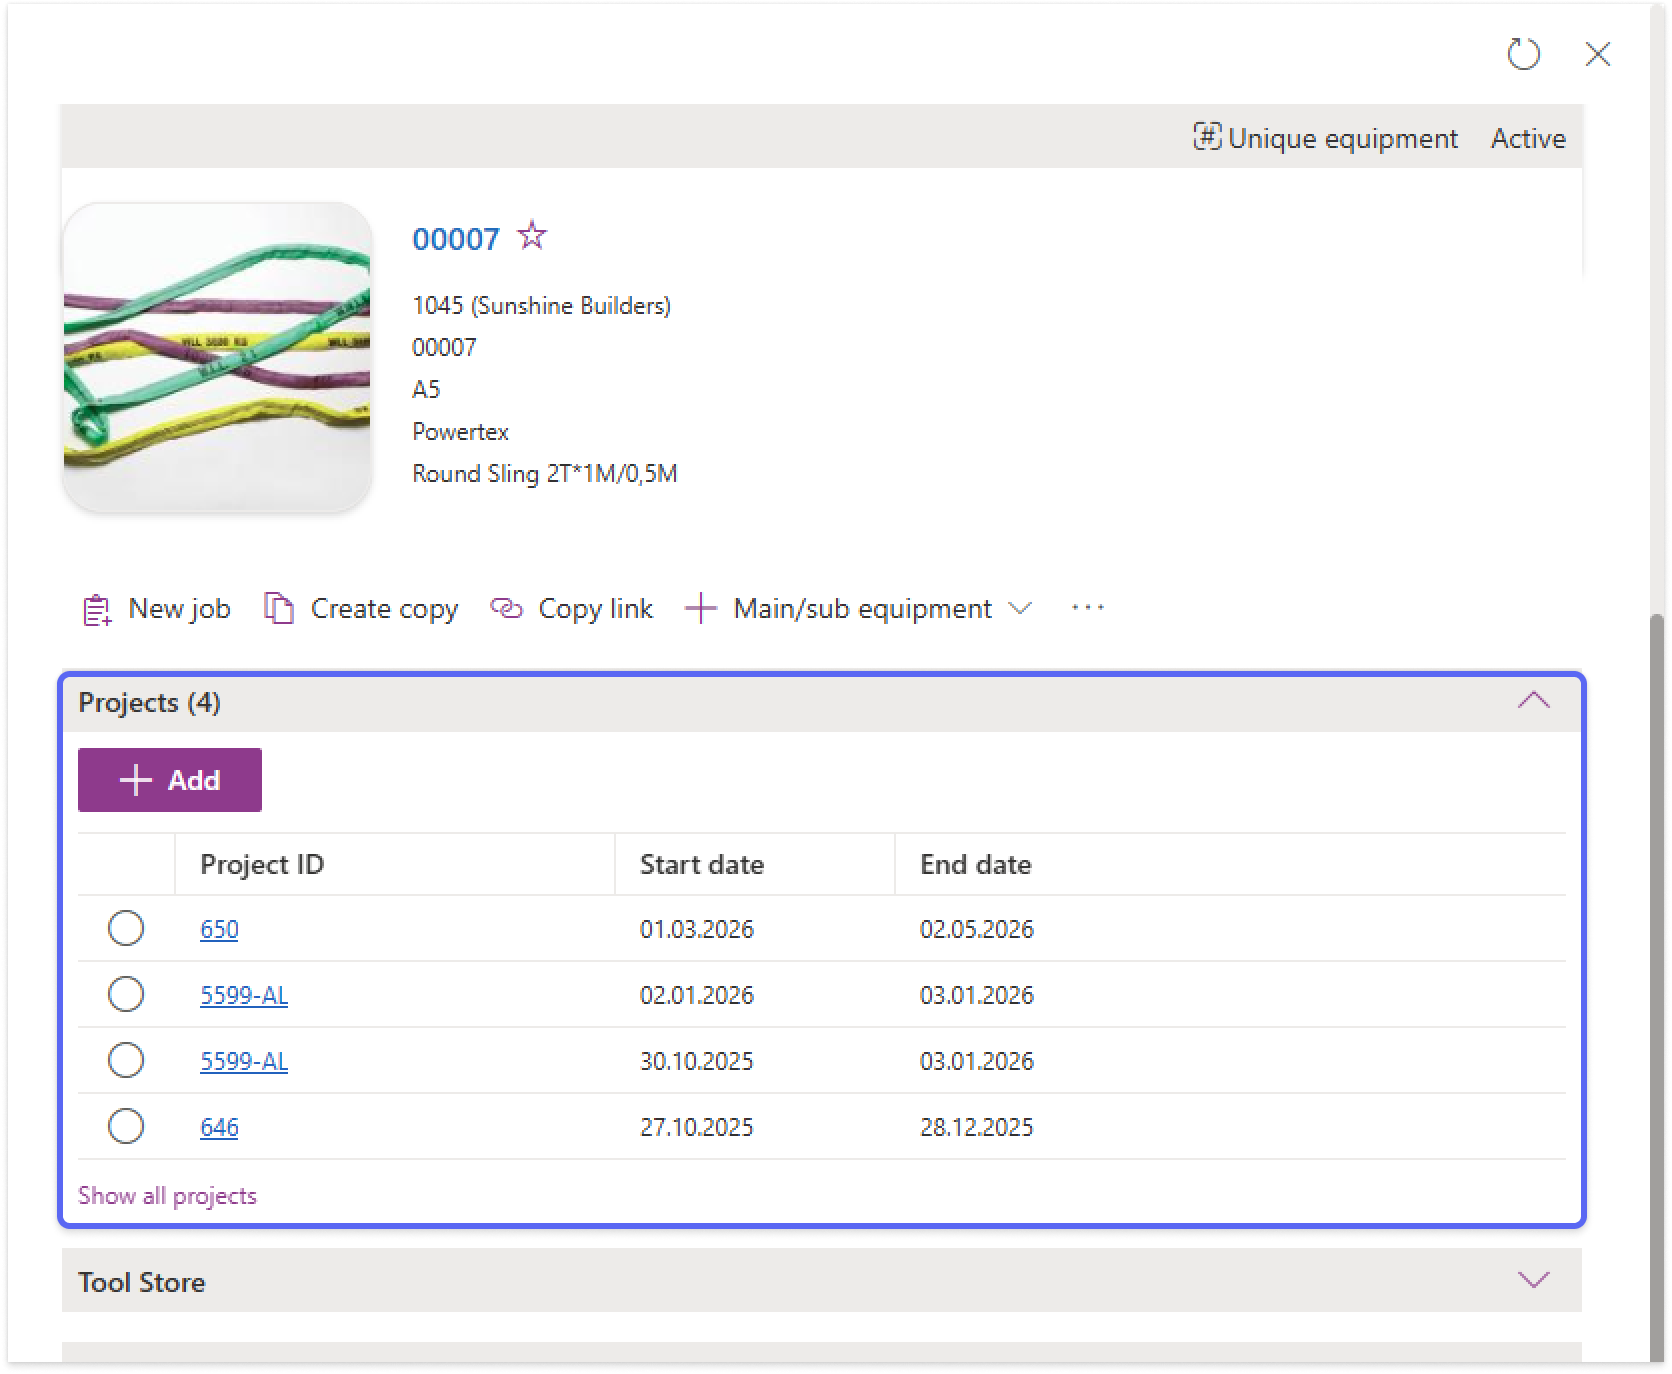
View related projects of an equipment
When viewing an equipment, you can find all projects in which it has been used in the Projects section. General and inspection projects can be added or removed directly from the equipment details, while rental and transfer projects are read-only.
When all projects are shown, use filters to narrow down the project list by their active status.

Export project data
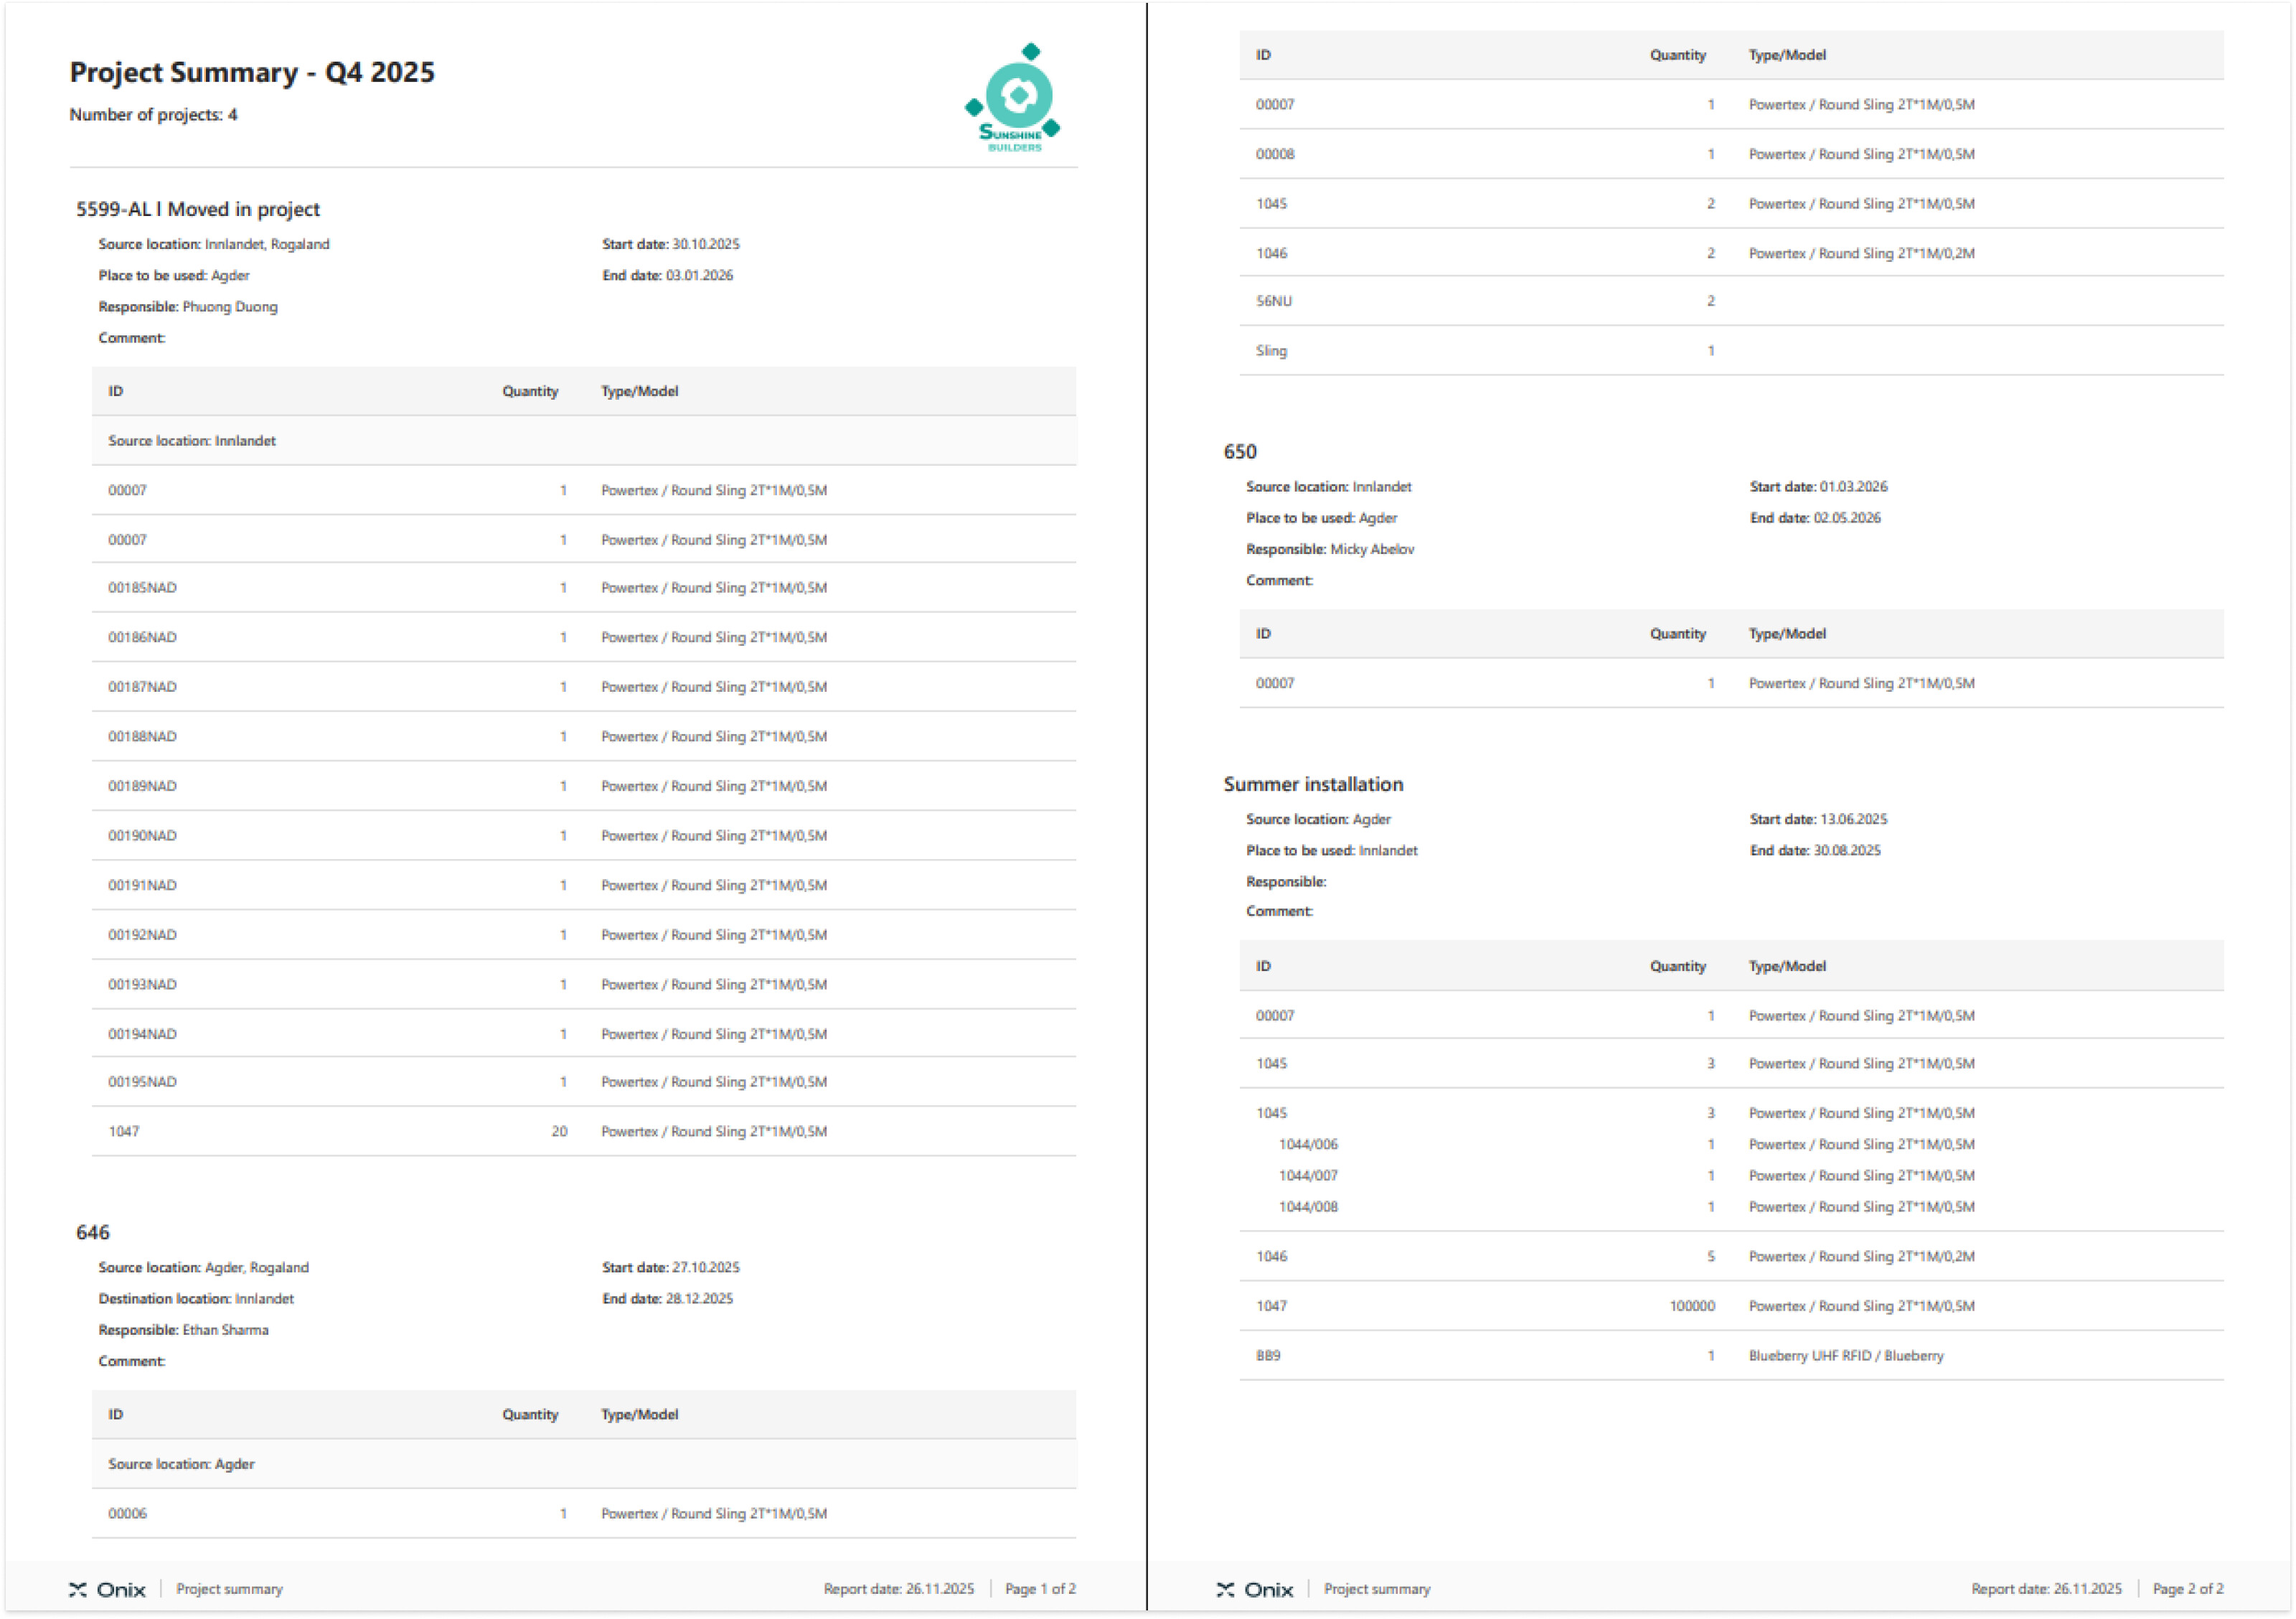
Generate project summary
Export a PDF file that summarizes all equipment in selected projects. The project summary can include up to 1 000 requests.
- In Onix Work, go to Projects
- Select a view and apply filter criteria if necessary
- On the toolbar, select Report > Export project summary > Enter the title > Save

After processing, the system automatically downloads the project summary to your device as a PDF file.
If you select specific projects, only their equipment is included in the summary. Otherwise, if you don’t make any selection, the summary includes equipment from all projects in the current view.
Export project list to Excel file
Important notes:
- You can only export up to 10 000 items.
- All display fields in your current view will become columns in the Excel file. Therefore, we strongly recommend you to customize the equipment list beforehand.
To export all projects from a view:
- In Onix Work, go to the Projects module.
- Customize your view to get the required data.
- Don’t select any project.
- On the toolbar, select Report > Export to Excel.
To export selected projects from a view:
- In Onix Work, go to the Projects module.
- Customize your view to get the required data.
- Select the relevant projects for export.
- On the toolbar, select Report > Export to Excel.
Onix Work will then take a short while to process the data. Once done, the Excel file will be automatically downloaded to your device.