Ultimate goals: This article aims to instruct you how to create and process an order in Onix Work as well as deliver equipment and documents to your customers, whether or not they are a member of Onix. It serves as a detailed guide for mastering every aspect of this module.
Who can use this feature: Users with access to Onix Work and Orders module. As of now, this is only available for Supplier license.
Create order
Step-by-step instructions
- Log in to Onix Work and navigate to Orders module.
- On your top left corner, select New.
- Enter order information and choose the customer who placed this order.
- Finally, select Save.
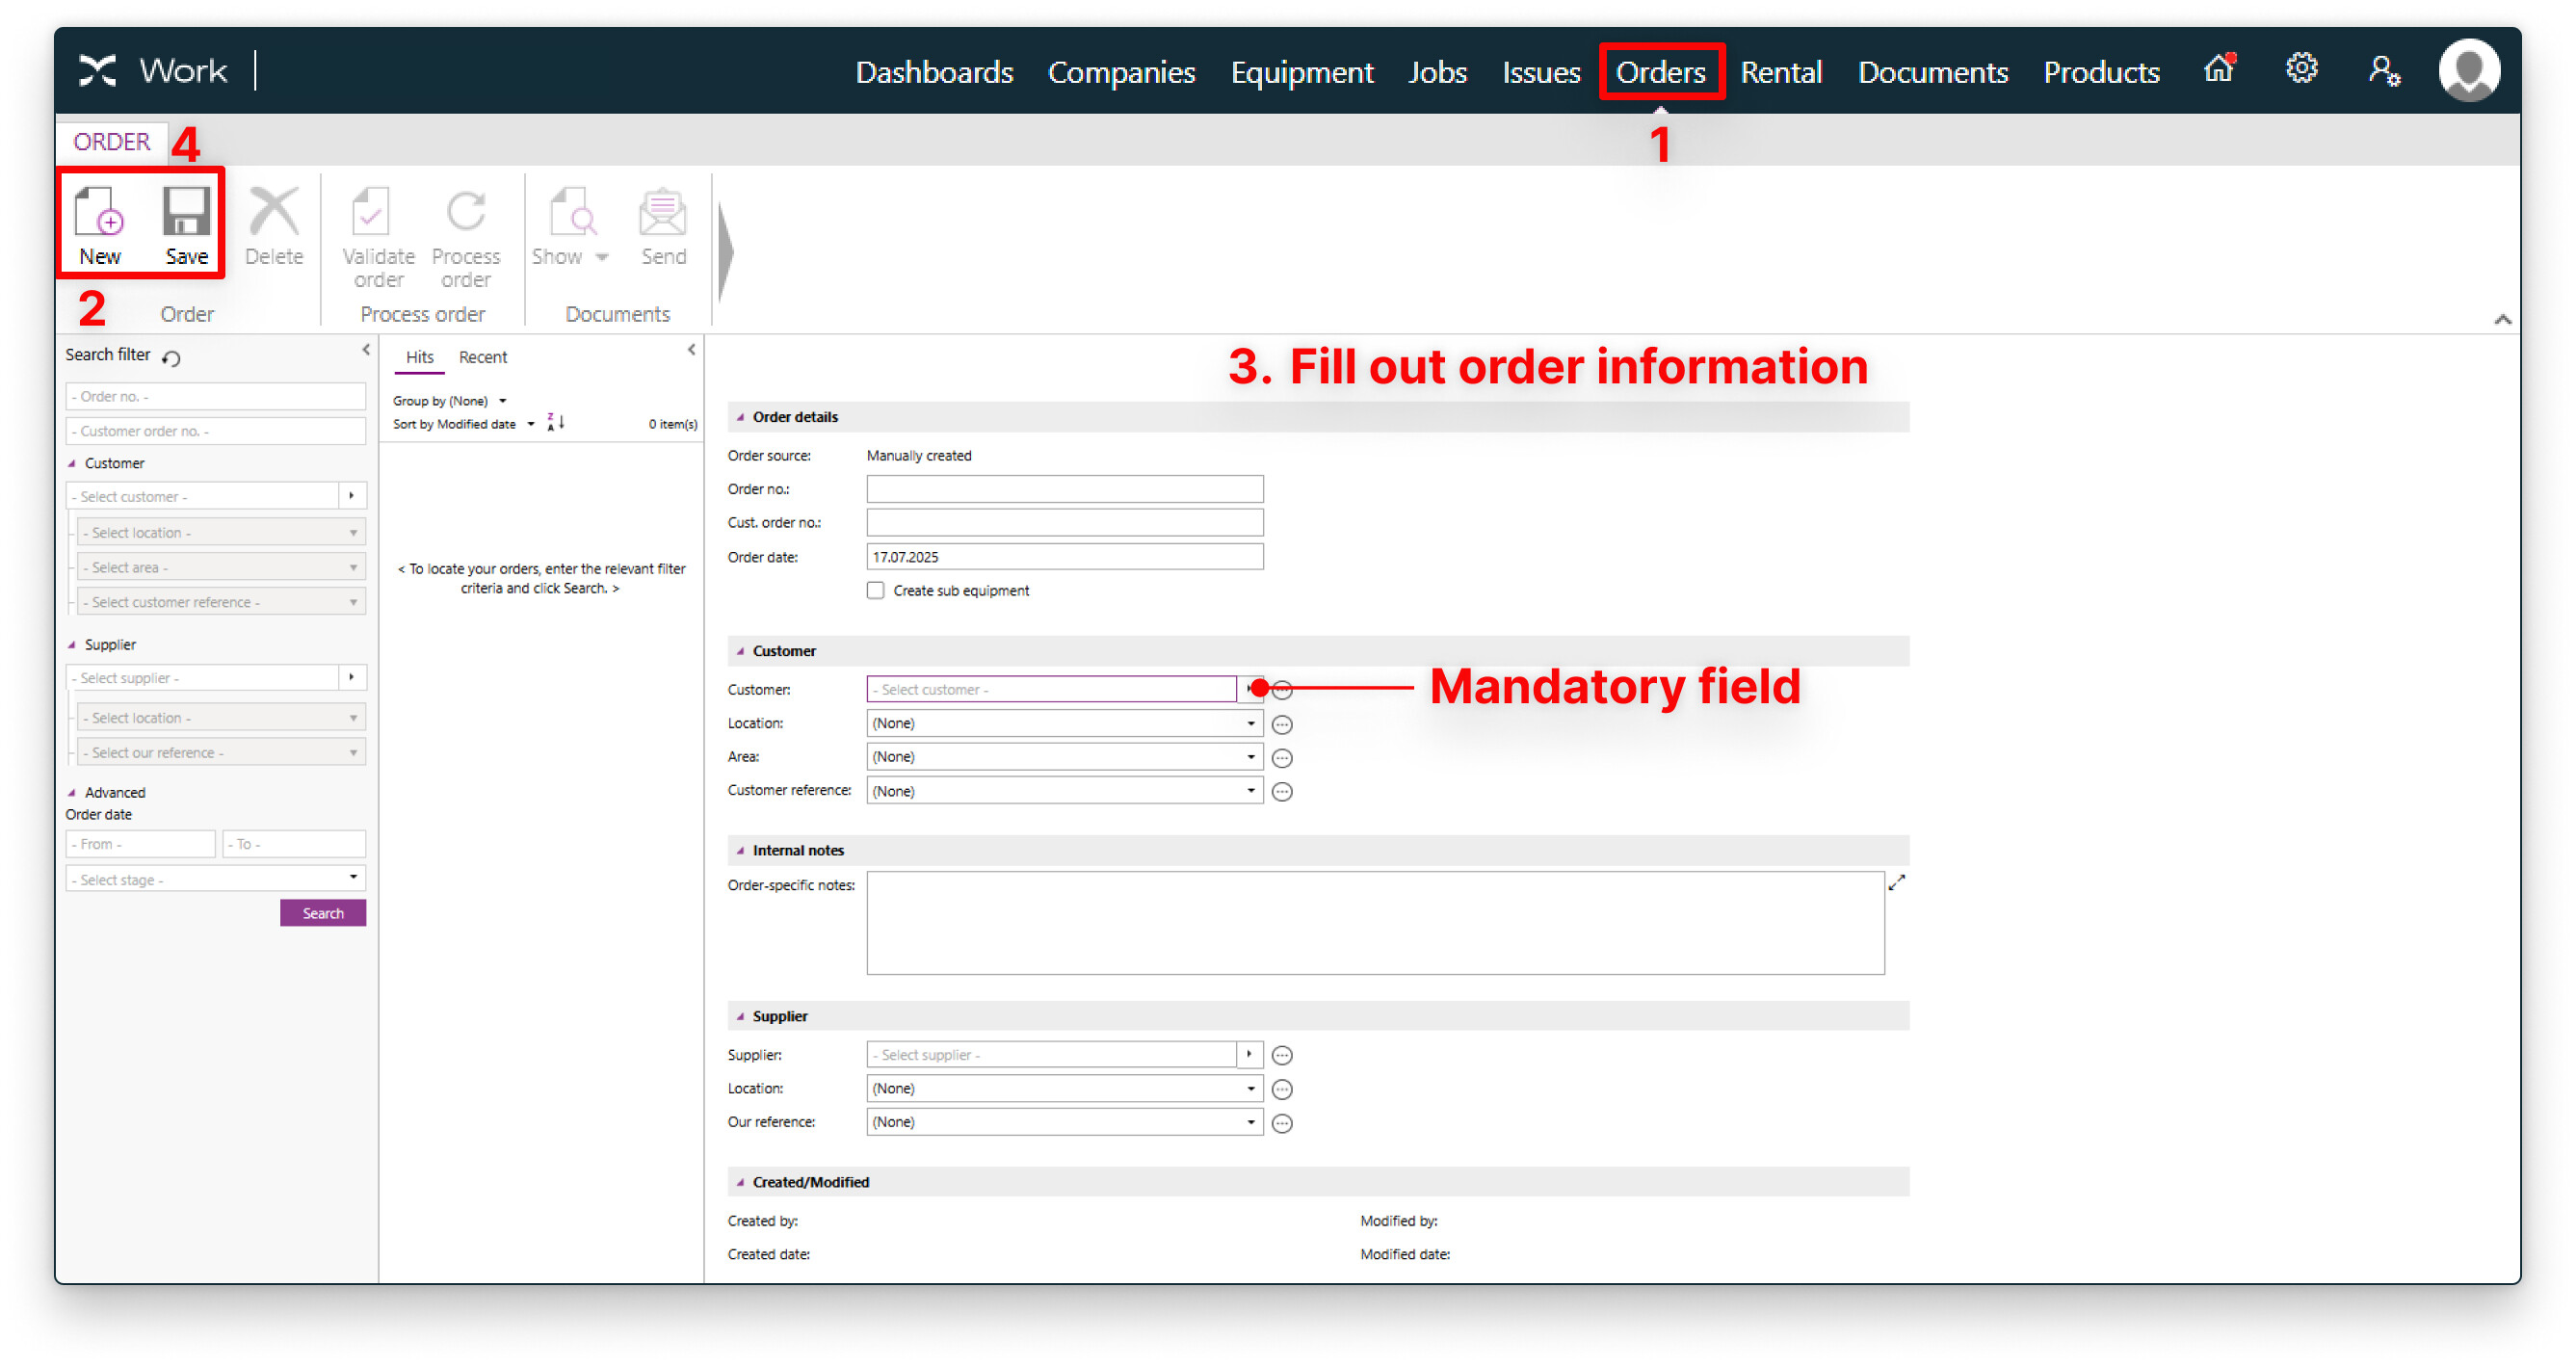
“Customer” fields
| Field | How to fill in | Remark | Need a new option? |
|---|---|---|---|
Customer |
Press the arrow button > Select an option from the list. |
This field is mandatory. |
If the customer uses Onix Work, go to Companies module to form a connection with them first. If the customer doesn’t use Onix Work: Press the arrow button > Create new company > Fill out non-member company info > Hit Save . |
Location |
Same as above |
Optional. Select a customer before you can choose one of the locations created per customer. | Click the three-dot button > Type in new value > Press + > Select the option > Hit Save . |
Area |
Same as above |
Optional. Select a location before you can choose one of the areas created per location. | Same as above |
Customer reference |
Same as above |
Optional. Select a customer before you can choose one of the references created per customer. | Same as above |
Options available in the drop-down list are synchronized from and to Companies module.
Meaning any new options added for these fields in Orders module would also be updated to Companies module.
“Instructions” fields
| Field | Default value | Change value |
|---|---|---|
Form requirement |
Auto-populated with values synchronized from Companies module. | Changes can be made in Orders module (if necessary); however, the updates won’t be reflected in Companies module. |
Control regime |
Same as above | Same as above |
Show owner's equipment ID |
Same as above | Same as above |
If you wish to include owner’s equipment ID in the Numbering step, select the associated box accordingly.
“Internal notes” fields
| Field | Instructions | Remarks |
|---|---|---|
Order-specific notes |
Enter the relevant comment. | These notes are visible for Onix Pick and Pack users while picking equipment. |
Customer-specific notes |
Enter the relevant comment. | By default, this field fetches data from the customer company’s internal instruction in the Companies module. Editing this field in the order also updates the internal instruction in the Companies module. |
“Supplier” fields
| Field | How to fill in | Remark |
|---|---|---|
Supplier |
Press the arrow button and select an option from the list which includes: |
This is set to your logged-in company, by default, if no value entered. |
Location |
Press the arrow button > Select an option from the list. | Select a supplier before you can choose one of the locations. |
Our reference |
Same as above |
Same as above |
Workflow stage indicator
This is supposed to be manually selected and is NOT automatic. Therefore, don’t forget to change order stage to keep others informed of how far you’ve progressed in the workflow.

Create sub equipment
Onix Work also enables creating sub equipment upon order delivery via grouped order lines. This helps enterprises effectively manage different types of equipment from giant ones to tiny little stuff.
Learn how to deliver order lines that contain main/sub equipment →
Create order lines
Step-by-step instructions
- In an order, switch to the Order lines tab.
- On your top left corner, press the New button.
- On the Select product dialog, opt for a desired product.
- Hit OK.
- Enter relevant information for the order line.
- Finally, click Save.

“Main” tab
Product information will be prepopulated wherever available. Things to note:
Quantity
Must be filled out for the order line to be successfully created. Its value results in the same number of rows in Numbering - Unprocessed.
E.g. Quantity = 185 - This means 185 equipment/rows are created for numbering.
Process
If the process is “Create equipment and file job”, upon processing, equipment are created, jobs with corresponding forms are filed, and documents are created and attached to the corresponding equipment.
Auto-process on a designated workflow stage
When the checkbox is enabled, the order line will be automatically moved to the next stage according to the rules set in Onix Work > Settings > Workflow > Order line.
Learn how to auto-process order lines →
Location and area
By default, the order line’s location and area follow that of the order. You can select another value if the order line’s location or area is different.
Comment on job
This comment is visible on the documents that are generated from filed jobs.
Order line-specific notes
These notes are visible for Onix Pick and Pack users while picking equipment. |
“Properties” tab
There are two types of property:
- System property: list of default properties created by Onix system, available for use in all member company accounts.
- Custom property: list of customized properties created per logged-in company.
Default properties
Automatically synchronized from products.
Add new
- To use an existing property field: Edit > Select properties > Add a property > Choose a property from the list.
- To create a brand new property field: Edit > Select properties > Manage properties > Add > Fill out the Create new property panel > Save.

You can even re-arrange the selected properties by dragging them up and down in the Select properties panel.
Remove
Click Edit > Select properties > Hit ![]() at the unwanted property > Save.
at the unwanted property > Save.
“Documents” tab
There are two types of document origins:
- Shared document library
- Product
Documents uploaded from local device do not have any origin value assigned.
Default documents
Automatically synchronized from products.
Add new
- From shared document library: Add document > Select Shared document library > Select some desired documents > Apply
- From local device: Add document > Select Upload from this device > Browse or drag and drop your files > Upload

Remove
This option is only available for documents added from local device or shared documents library.
- Select the unwanted document > Remove > Yes.
Include/exclude default documents
This option is only available for default documents synchronized from products.
- Select the unwanted document > Exclude.
Link documents to specific equipment
By default, documents added are linked to all equipment per order line unless you decide to link certain document to a specific equipment. Here’s how:
- Select the desired document.
- Hit Edit.
- In the Serial no. or Batch no. fields, type in the desired equipment ID.
(If you’ve already numbered the order line, you can choose one of the available options in the drop-down list.) - Click Save .
- Decide whether to remove the document from the Shared document library.
Print all documents to PDF
-
For the entire order: Go to Order tab > Click Show > Choose between Listed per document type or Listed per order line > Print to PDF.
-
For selected order line(s): Go to Order lines tab > Select desired line(s) > Click Show documents > Choose between Listed per document type or Listed per order line > Print to PDF.


Send documents via email
- For the entire order: Go to the order’s Main tab > Hit Send.
- For selected order line(s): Go to Order lines tab > Select desired line(s) > Click Send documents > Select recipient > Hit Send.


“Forms” tab
This tab include all types of form or document to be generated for this order.
Default forms
Automatically synchronized from products.
Add new
Switch to the Forms tab > New > Select desired forms > Fill out required data.
Remove
Hit ![]() at the unwanted form > Save.
at the unwanted form > Save.
“Texts” tab
This feature serves the need of inserting custom text in forms and certificates of specific order lines.
It is applicable to all form types, except for:
![]() Declaration of Conformity
Declaration of Conformity
![]() Inspection Report
Inspection Report
Default text
Automatically synchronized from products.
Add new
Go to the Order lines tab > Open Texts tab > Setup > New text > Enter description and text > Save.
button is a place to store all custom texts ever generated in your Onix Work account.
Hide from list
Go to the Order lines tab > Open Texts tab > Setup > Select unwanted text > Uncheck the “Active” box > Save.

Select text to display in documents generated for this order
Go to the Order lines tab > Open Texts tab > Select an order line > Check boxes in front of the desired text.

Icon description

Numbering
Input numbering data
To successfully process order lines, you must first number all equipment given either serial number or batch number is required. This is where you do so.
To number one equipment at a time, manually enter a value into each row.
To number multiple equipment at once, use the Auto-fill feature, or simply copy values from your own Excel sheet and paste them onto Onix Work.

-
Serial no.:
- If you’re going to key in a serial number, it must contain numerical character(s).
- Numerical part will increment sequentially.
- Alphabetical part (if any) will remain the same.
-
Batch no., Owner’s ID, Prod. year:
- Numerical and alphabetical parts will remain the same.
-
Auto-fill filter:
- Select field(s) you wish to apply auto-fill for.
- Select field(s) you wish to apply auto-fill for.

Add existing equipment
If your company uses Onix Pick and Pack to scan tags and add equipment into order lines, the global ID of each scanned item is visible in the Global ID column. Otherwise, this field is empty.
You can select an existing equipment to the order line, or adjust a picked item’s global ID.
- In the Numbering tab > Select an open order line.
- In the global ID column, hover on a cell and select the Select equipment button > Search for the relevant item > Apply.
The selected equipment is now assigned to the order line, and its information is automatically populated in the numbering table.

Recall or adjust processed items
The “Processed” tab lists out pieces of equipment which have already been numbered and processed.
Here you can also withdraw the entire order or make some changes to equipment, order or document details as you wish.
Learn how to update certificates, orders or equipment after delivering →
Validate order
This button serves as a checking tool ensuring we cover all required information before processing an order.
If the order is good to go, a message pops up saying “The order has been validated.”
If the order is missing mandatory data, a warning message pops up telling users which product is missing what info. In that case, simply go to the order line that contains the errored product and make necessary updates.

Process order
For the entire order
- Within an order, switch to the Main tab.
- Press Process order.

For selected order lines
- Tick the box(es) before the desired order line(s).
- Hit Process selected order lines.

These are the messages you’ll come across when processing an order:
- In progress: “The selected order lines are being processed. You can check the progress or come back when the processing is complete.”
- Estimated processing time: “The order line is being processed and expected to complete in about … minute(s). During this time, all related pages will be view-only.”
- Successfully processed: “The order line was processed successfully at [date - time] by [user name].”