In Part 3, we will go through the features related to jobs and issues of equipment.
1. MANAGE JOBS
1.1. Create a mandatory inspection job
To start working, you need to select the equipment first.
- In Equipment, you can find the equipment by
- Search by equipment’s serial number, batch number, Onix ID
- Scan the tag (QR, RFID, NFC) on the equipment
- On the equipment tile, swipe left to open the menu and select New job.
- If you want to select multiple equipment at a time,
- Press and hold the screen for a few seconds, or select the
 icon on the right corner of the top bar
 - Select the checkboxes next to the equipment that you want to create jobs for
- Click New job on the bottom menu
- Fill in the job details, checkpoints’ statuses and comments (if any)
- Tap Save to save your changes
- Press and hold the screen for a few seconds, or select the
1.2. Create Quick inspection
Quick Inspection is an efficient way to inspect a large quantity of small equipment.
- The usual process is inspecting the equipment, then gathering OK equipment in one place and creating a job to cover them all.
- The other ones are saved as Discarded.
To create Quick Inspection:
- On Equipment, find and select equipment that you want to create job for
- Select Quick Inspection
- The Quick Inspection job is created with the default values.
- Open Equipment section, tap the status of each equipment to update the status or leave comments, then click

- If you want to apply statuses for multiple equipment at a time:
- Click the icon on the upper right corner
- Select the equipment and click Apply status
- Choose the status available in the bottom sheet
When Quick Inspection job is filed, equipment marked as NC/M will have their status updated to Discarded/Missing respectively.
1.3. Create preventive maintenance jobs
You can create preventive maintenance jobs for one or multiple equipment at once. In case you perform preventive maintenance on multiple equipment, what happens when the job is filed are:
- Each piece of equipment is linked to a separate job. In other words, multiple preventive jobs are created automatically, with the number of jobs matching the number of selected equipment.
- If the Service report form is enabled, each equipment is linked to a new document specific to that equipment.
Here’s how:
- Select the relevant equipment → Tap + and choose New job.
- In the Checklist screen, select Preventive tab and a relevant checklist. (If you can’t find any checklists, you should contact your administrator to check the equipment’s checklist setting.)
- Fill in the job details, checkpoints’ statuses and comments (if any) → Tap Save to save your changes.
1.4 Create operator jobs

You can only create one operator job for one equipment at once. Here’s how:
- Select the relevant equipment → Tap + and choose New job.
- In the Checklist screen, select Operator tab and a relevant checklist. (If you can’t find any checklists, you should contact your administrator to check the equipment’s checklist setting.)
- Fill in the job details, checkpoints’ statuses and comments (if any) → Tap Save to save your changes.
1.5. Add/remove equipment from an existing job
To add equipment:
- On Jobs, select the job
- Click
 on Equipment section
 - Click
 to find equipment by searching or scanning
 - Swipe left on the equipment and click Add. Then click
 on the top left corner to get back to the Related equipment screen
To remove equipment:
- On Related equipment screen, swipe left on the equipment or click the icon to select equipment that should be removed.
- Click Remove
Note: You cannot remove all equipment of the job.
Also, you are able to handle issues attached these equipment.
- On the Related equipment screen, select the equipment
- Select Issues section to enter Related issues screen
- Select each issue and take proper action

1.6. Complete a checklist
Fill statuses
To fill each checkpoint’s status, open the job’s checklist > Tap/Click each checkpoint’s status > Choose the relevant option.
To fill multiple checkpoints’ statuses at once, select Fill ? statuses at the top of the checklist or in each check group > Choose the relevant option. This action will apply the selected status for all checkpoints whose status is empty.
Fill checkpoints
Checkpoints’ details must be completed one by one.
- Select to open a checkpoint. You’ll see the procedure (if any) which you can refer to during the checkpoint completion.
- Select the checkpoint’s status > Input your comment on the checkpoint.
- If the checkpoint’s status is C, RC, MO, or NC, an issue with the corresponding status will be generated once the job is filed.
- The issue’s description will be fetched from the checkpoint’s comment.
- If the issue has been solved during inspection, enable Is Solved and input the solution.
- Add picture to the checkpoint for further reference by selecting the + button.

Comment on checklist
Depending on the form used in your job, the checklist’s comment will display on the control documentation.
To comment on the checklist, select Comment > Enter the relevant value > Save.

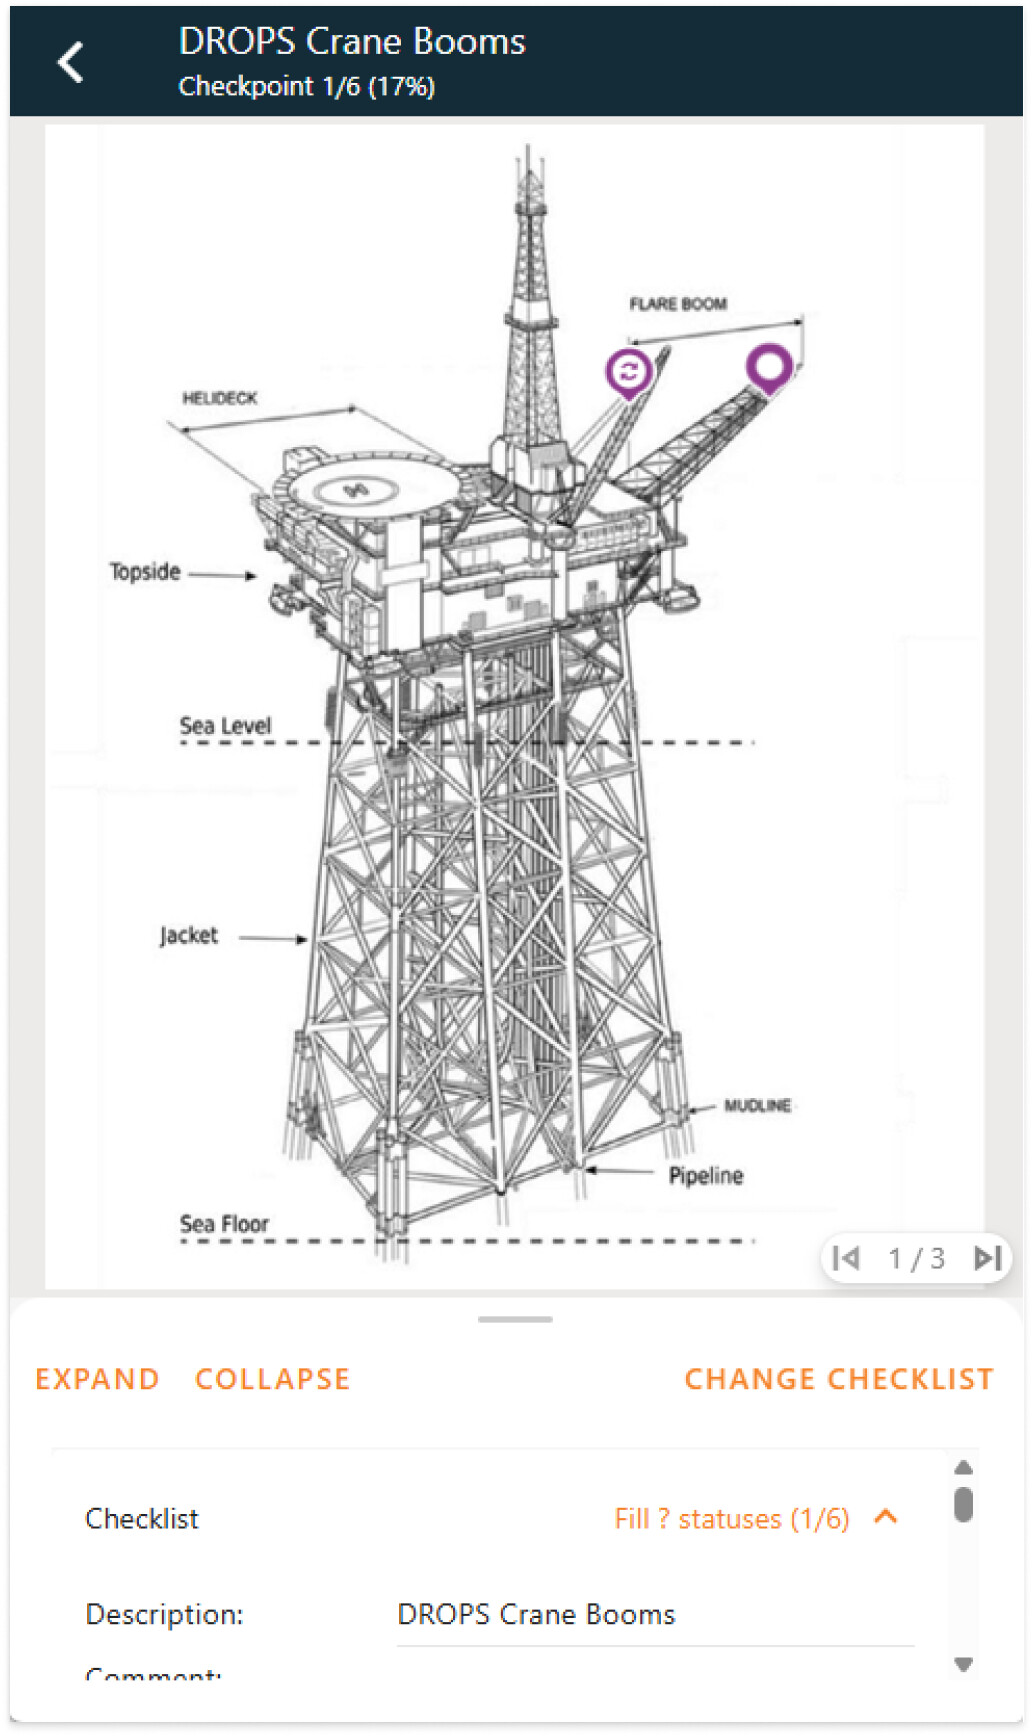
Complete a checklist with drawings
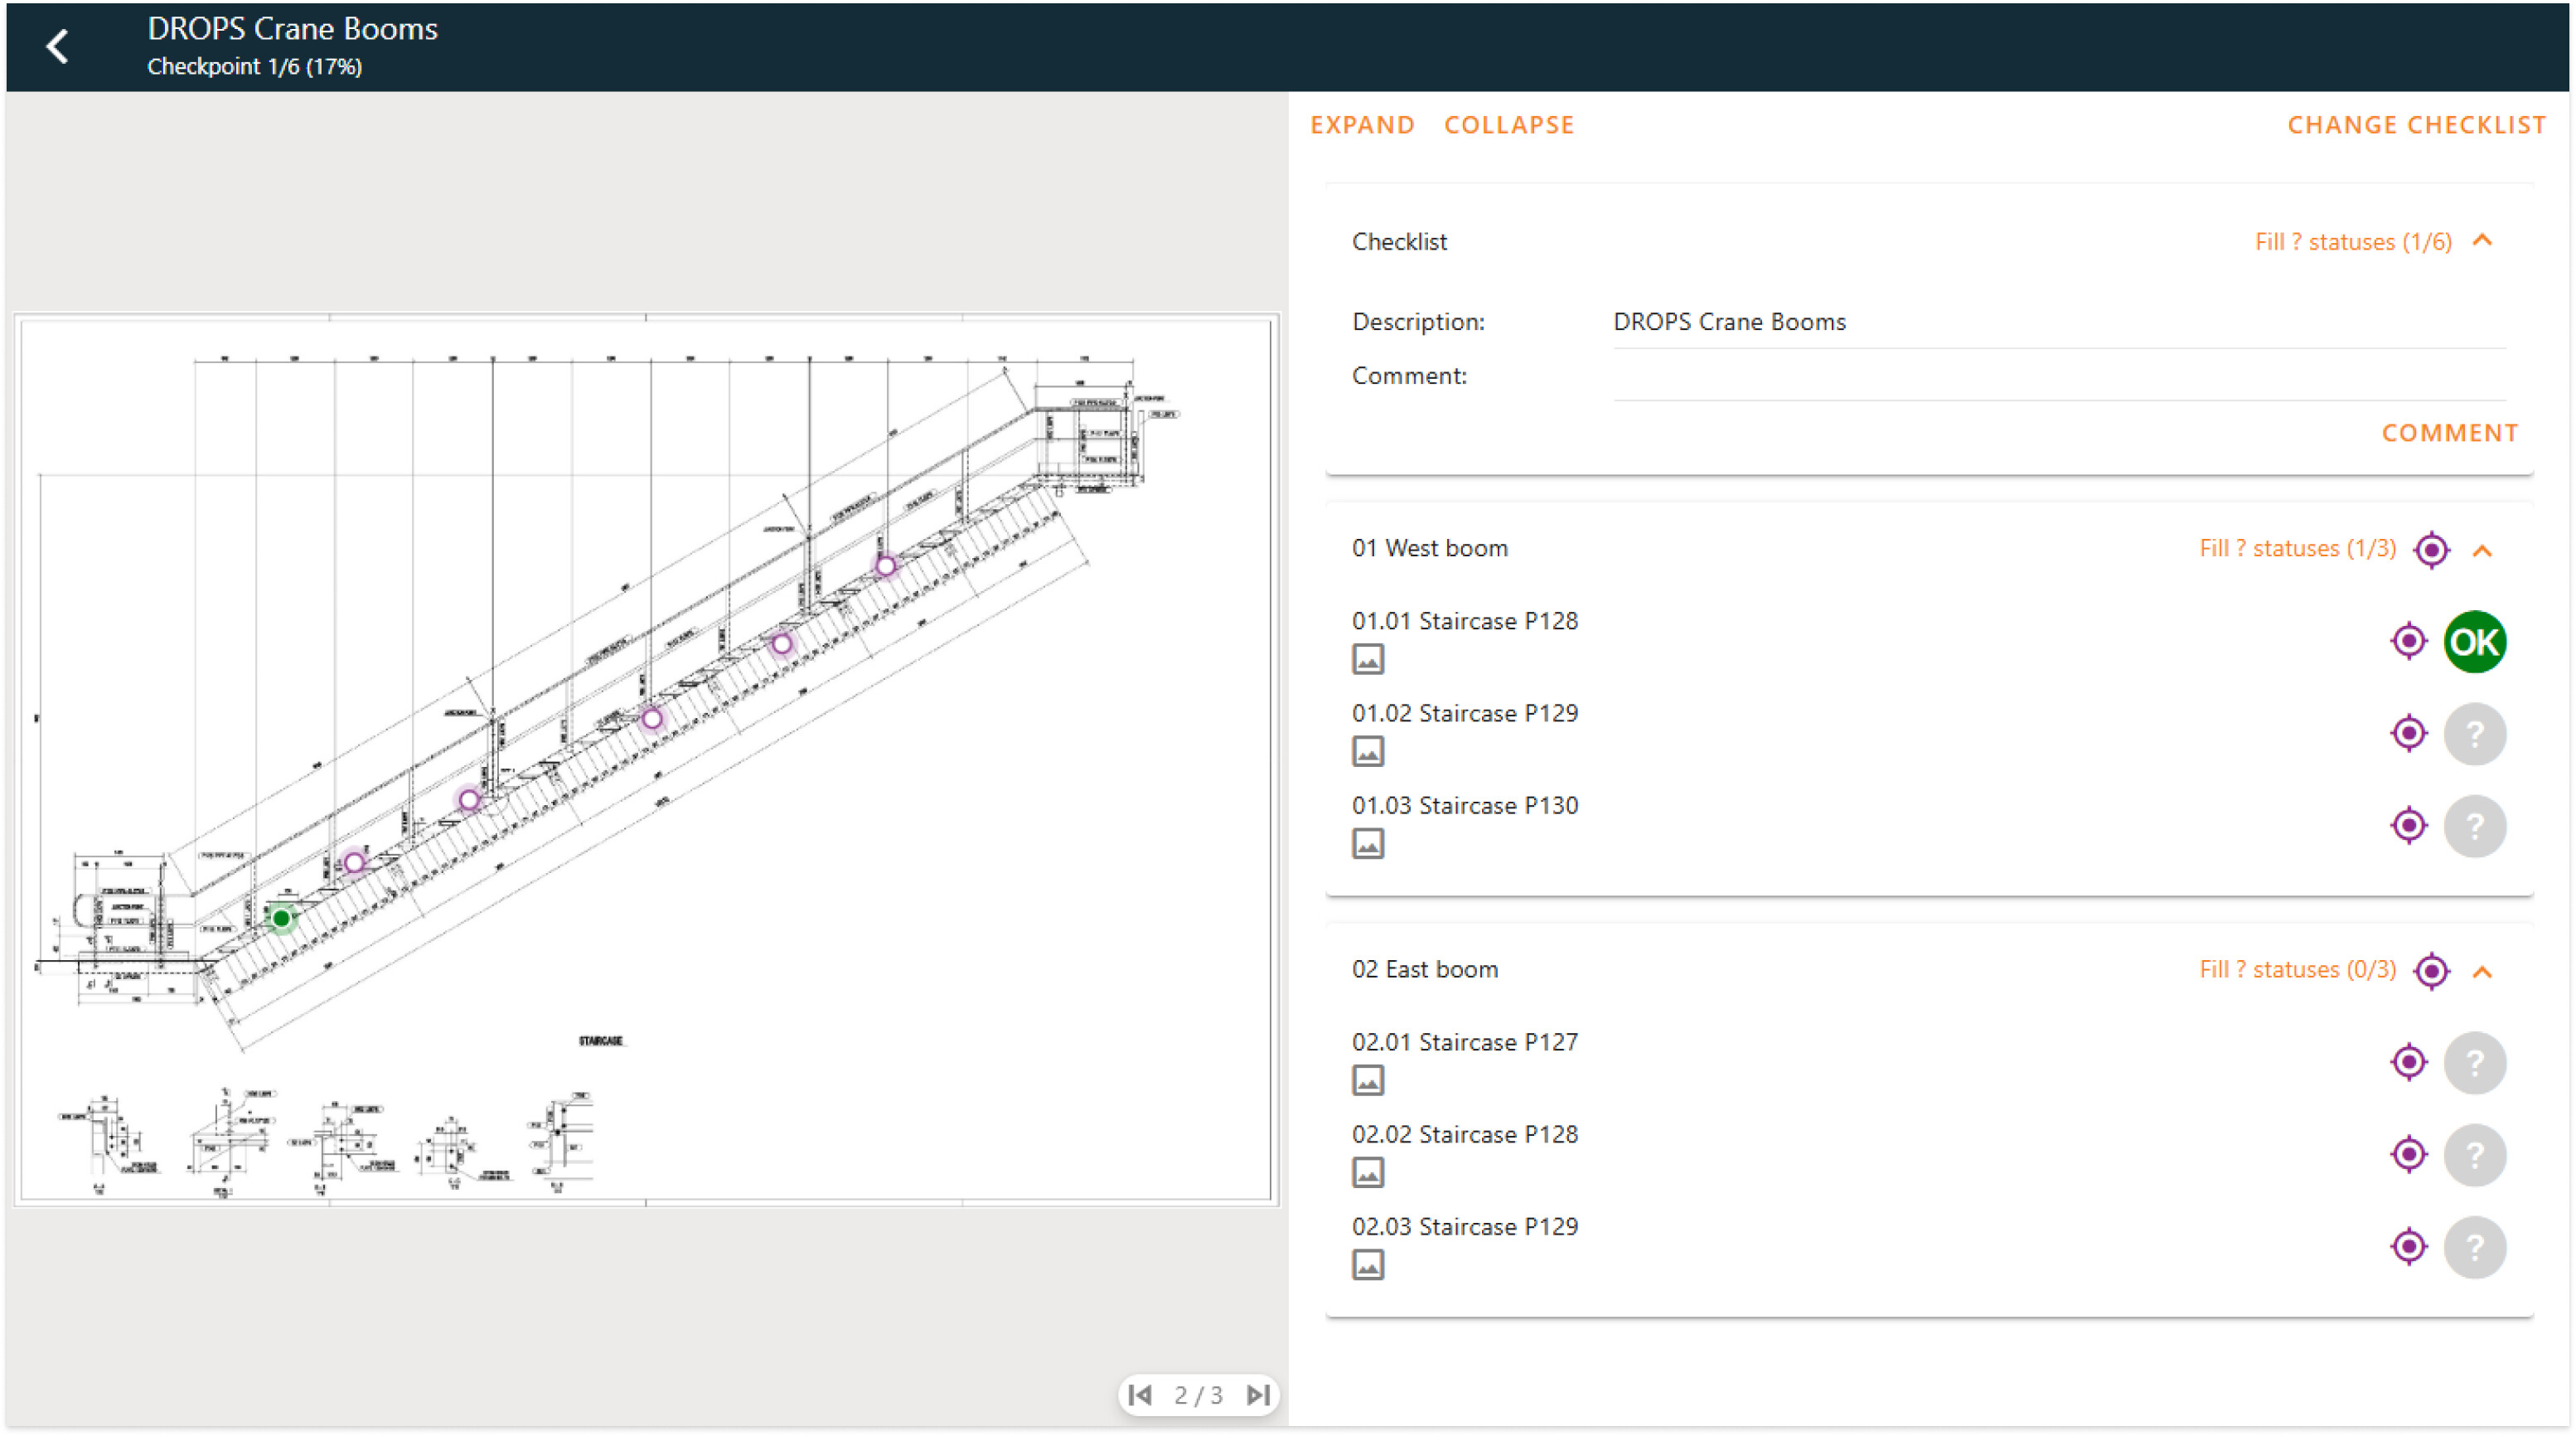
When a checklist contains drawing, checkpoints and check groups are pinned directly on the drawing. You can fill in each checkpoint either from the checklist detail, or from the drawing.
-
Select the Navigate button in a checkpoint or check group. You’ll be directed to the corresponding marker on the drawing.
-
Tap or click the marker again > Complete the status and comments of the checkpoint or check group.
Tip: Checkpoints with markers display a picture icon in the checklist.
1.7. Change job status and leave comment
To change job status or update comment:
- In the job, expand the Job status and comment
- Select the status icon > Select the relevant option
- Input your comment > Save

By default, the job status is calculated based on the worst unsolved checkpoint, following Onix Work’s setting. Once this setting is enabled, you cannot select a job status that is better then the worst checkpoint’s status.

In case you want to have the job status to be better than the worst unsolved checkpoint, for ex: the worst unsolved checkpoint is RC, but you want to set the job status as C, then you need to turn on this option in Onix Work and download your company data again.
1.8. Change job class, checklist, form and job date
Change job class or checklist:
- In Jobs, select the job
- Scroll down to Job details section and click Save
- Select Job class or Checklist, and click Save
You can also change them in Checklist sections
Change form
- In Jobs, select the job
- Scroll down to Form section and click Edit
- Select form, and click Save
NOTE: When you change job class, job form or checklist, the data you have filled previously will be cleared.
Change job date:
- In Jobs, select the job
- Scroll down to Job details section and click Edit
- In Job date field, select a new job date, and click Save
When the job date is changed, the next due date is recalculated. If the job date is in the future, this job cannot be filed automatically after upload.
1.9 Create copy job
Create a copy of a newly created job to speed up repeated inspections. You can create a copy job to the same equipment or another one.
- Open a filed job > Select Create copy.
- Choose one of the following options:
- Create copy to this equipment: A new open job is created with the same details where applicable.
- Create copy to other equipment: Select the target equipment. The job’s interval and location will update to match the new equipment.

2. MANAGE JOB INTERVALS
2.1. How job interval is calculated
The Job intervals concept is found in Equipment and Job.
- On Equipment, the interval is designed and applied specially for that equipment.
- On Job, the interval is filled based on the control regime settings and is selected by default
If a new job is created on a single equipment, the job intervals generated from the equipment itself and control regime settings (selected by default) will be shown in Job intervals sections.
If a new job is created for multiple equipment,
- If these equipment belong to one control category, the job interval is calculated based on the its equivalent control regime category.
- If these equipment belong to different control categories, the job interval is calculated based the default category of the corresponding control regime.
2.2. Create, update and delete a new job interval
Create a job interval offline:
- Select the equipment or job
- Scroll down to Job intervals section
- Click Add
- Fill the interval information and click Save
NOTE: The filing action of job intervals created offline is always Update to equipment.
Delete a job interval created offline:
- In Job
- Click Edit on that interval
- Click Detele on the top command bar
- In Equipment
- Click the interval
- Click Delete on the top command bar
Update job intervals
In Job
- Click Edit on that interval
- Update, then click Save
- Job intervals created offline, only Next due date is available for update.
- Job intervals generated from Equipment or Control Regime, only Filing action is available for update.
In Equipment
- Click the interval
- Update, then click Save
- Only Due date is available for update.
- If you want to edit job class or interval, delete the job interval and create a new one.
2.3. Edit Done date and Done status
- In the Equipment module, select the concerned equipment → in the Job intervals section, tap the existing interval that you want to edit.
- Update the Done date and Done status → Save.

3. MANAGE ISSUES
Similar to Onix Work, Issues module helps you keep track of all open issues of the downloaded equipment. With different views implemented, you can easily follow up and take actions on the issues you care for in no time.
3.1. Create a new issue
- Select Equipment on the menu.
- Find the equipment you want to create issue for.
- Swipe left to open equipment’s menu and click New issue
- Alternatively, select the equipment > go to Issue section > click Add
- Fill the issue details and click Save
3.2. Update an issue
Update issue details:
- In Issues, select the issue
- In Details section, click Arrow to expand this section
- Click Edit to edit the issue details, then click Save
In Picture section, click Arrow to view the current pictures (if any). Click Add to take a new picture or upload from your device.
In the Related section, click on each section to find the equipment and documents attached.
Add document to an issue:
- In Issues, select the issue
- In related sections, select Documents
- Click Add
- Select Take photo or Brown to open the folder
- Fill in the document type and description, click Apply
Delete documents added manually:
- On Related documents screen, swipe left on the documents or select several documents that should be removed.
- Swipe left or click Delete
You cannot delete documents that were downloaded from Onix Work.
3.3. Handle issues
You can update, close or drop issues by using the text button on top of each issue.
- If the issue’s progress is Todo, you can either choose to Solve or Drop
- If the issue’s progress is New, you can either choose to set it as To do or mark it as Solved